 Bicycle For Your Mind
 The Planck
Planck EZ Helps Me Write
Product: Planck EZ: A Powerful, Backlit, Open-Source, 40% Mechanical Keyboard | Planck EZ
Price: $(240-255)
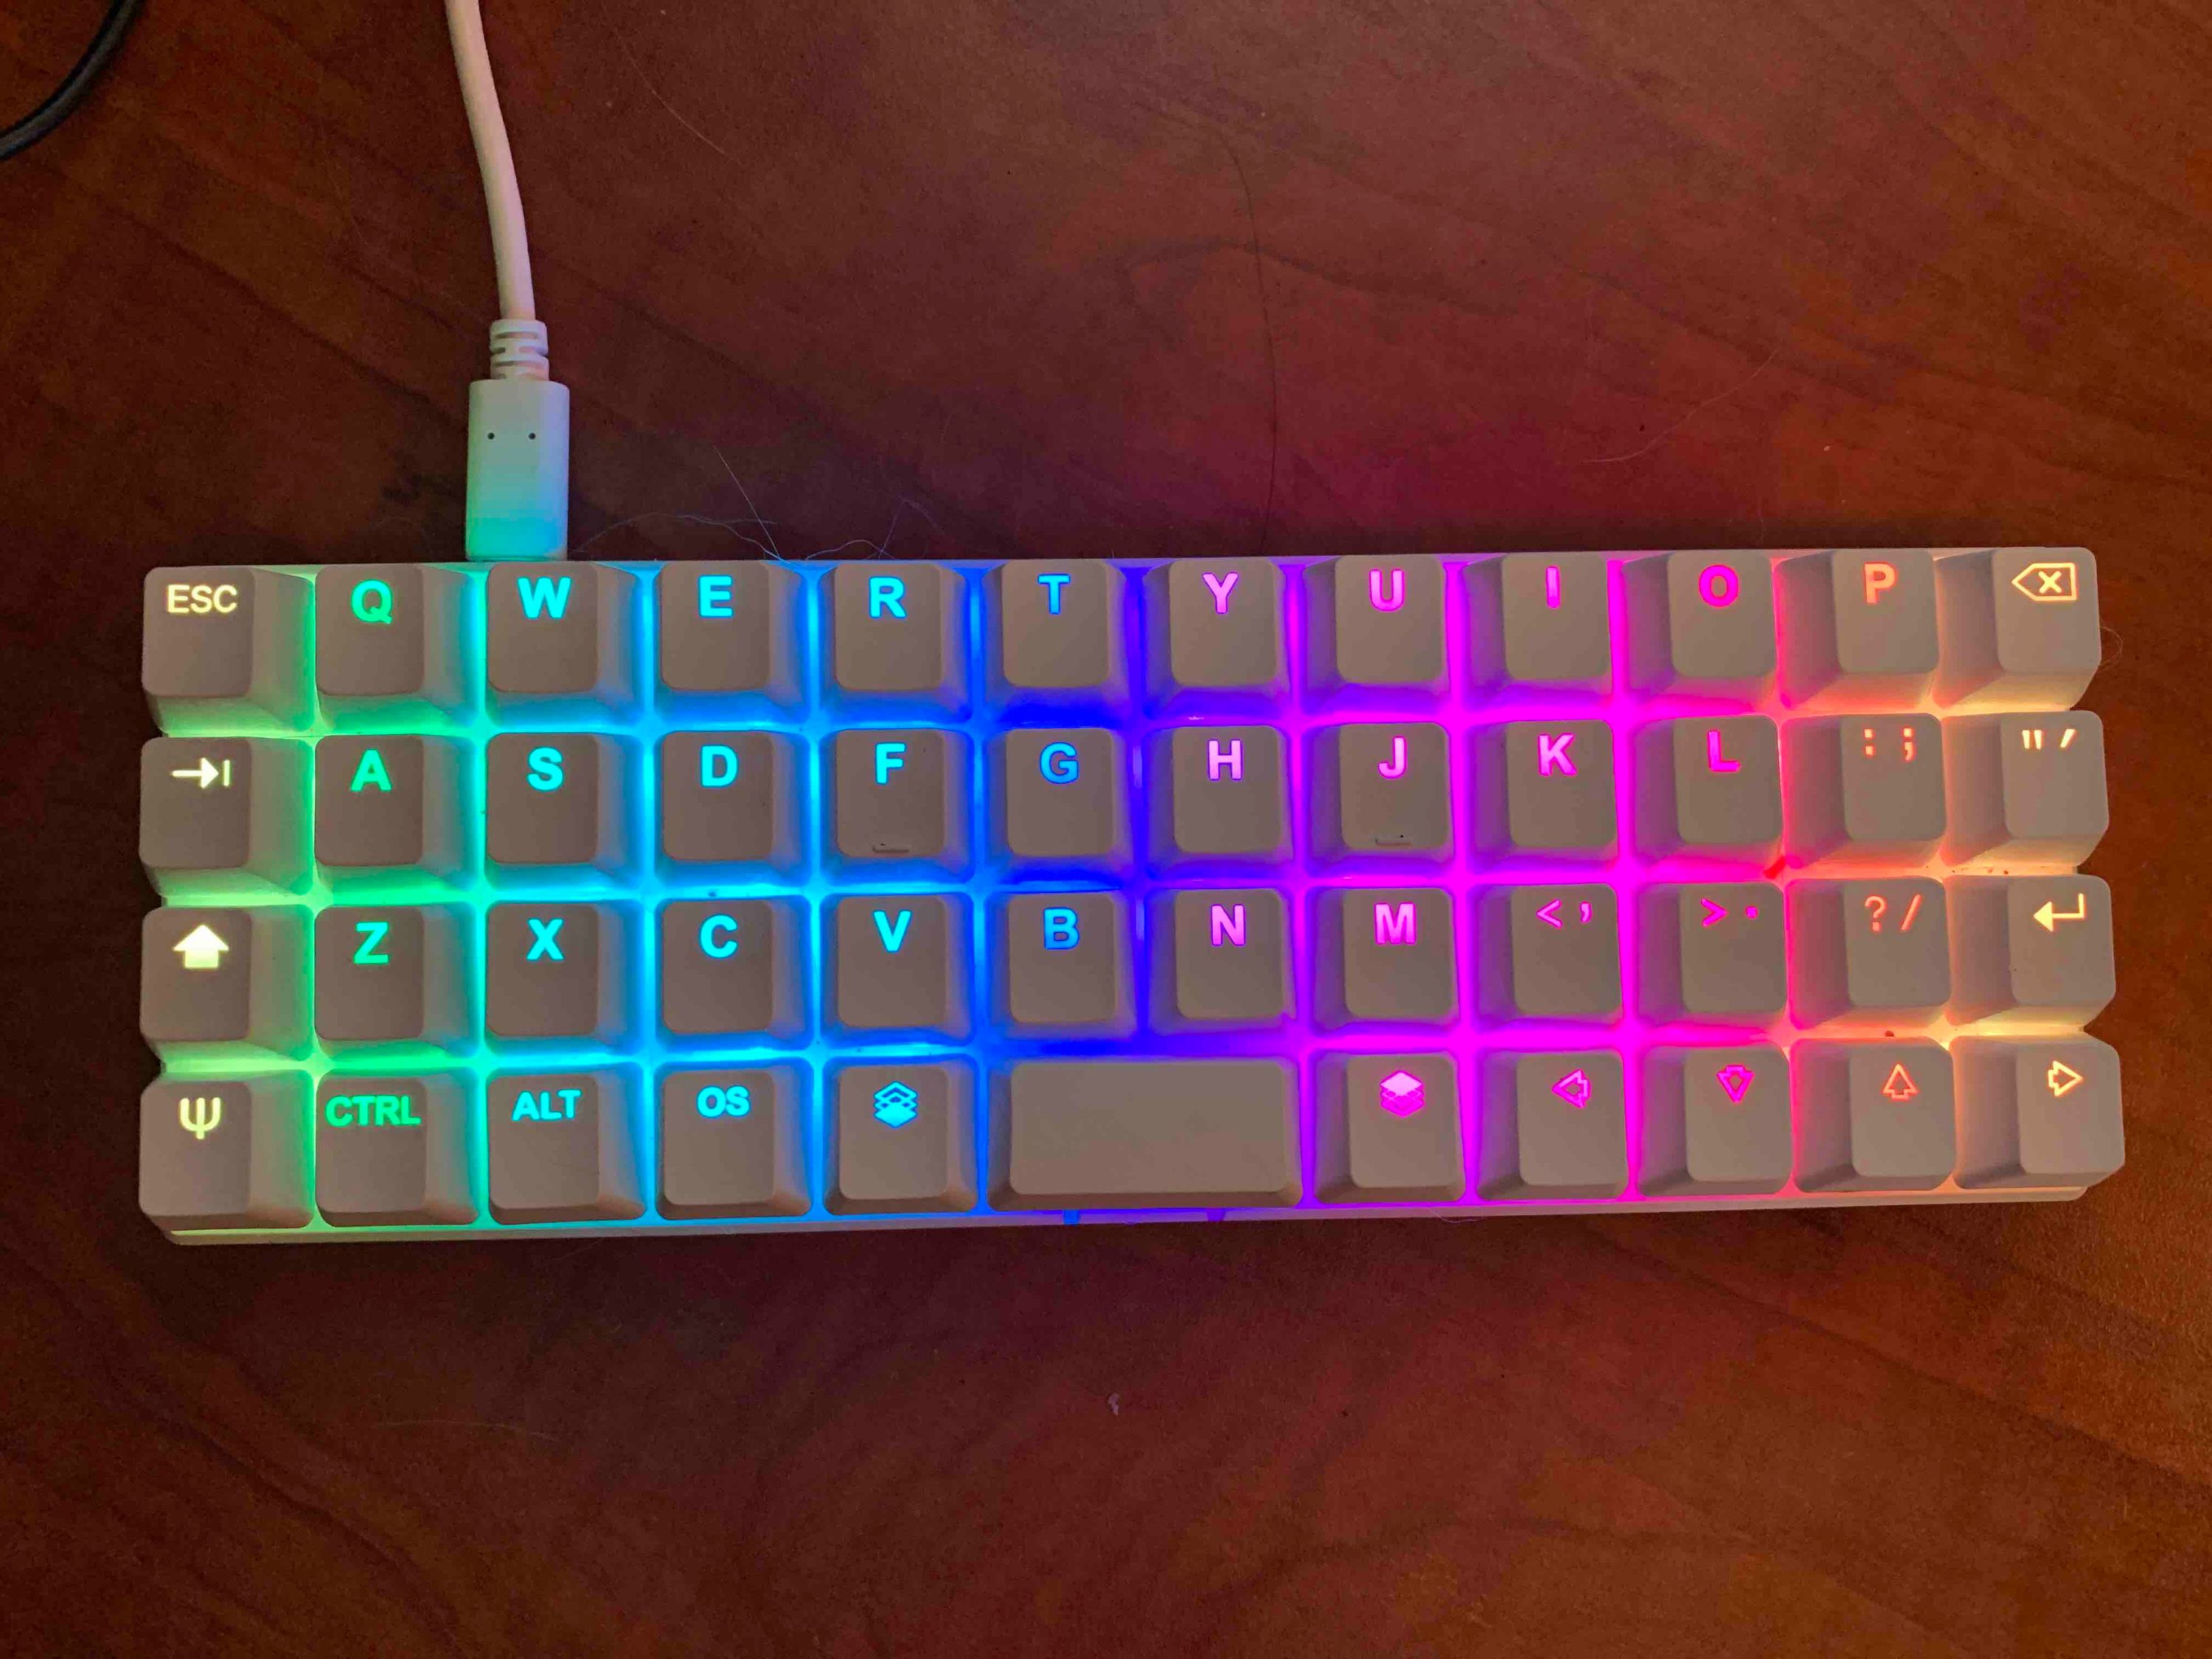
The Planck EZ
It has 47 keys. It is tiny. When the keyboard lights are on, it is a little overwhelming. It feels well made and it is pretty. It is ortholinear. It is customizable.
Ortholinear? What does that mean? Look at the positions of Q, A, and Z. They are on a straight line. In the usual keyboards, they are staggered. Straight on an ortholinear setup. The logic behind the ortholinear setup is that fingers typing on it don’t have to travel as much. That is less stress on your fingers and the typing speed increases.
 The Planck Without the Light Show
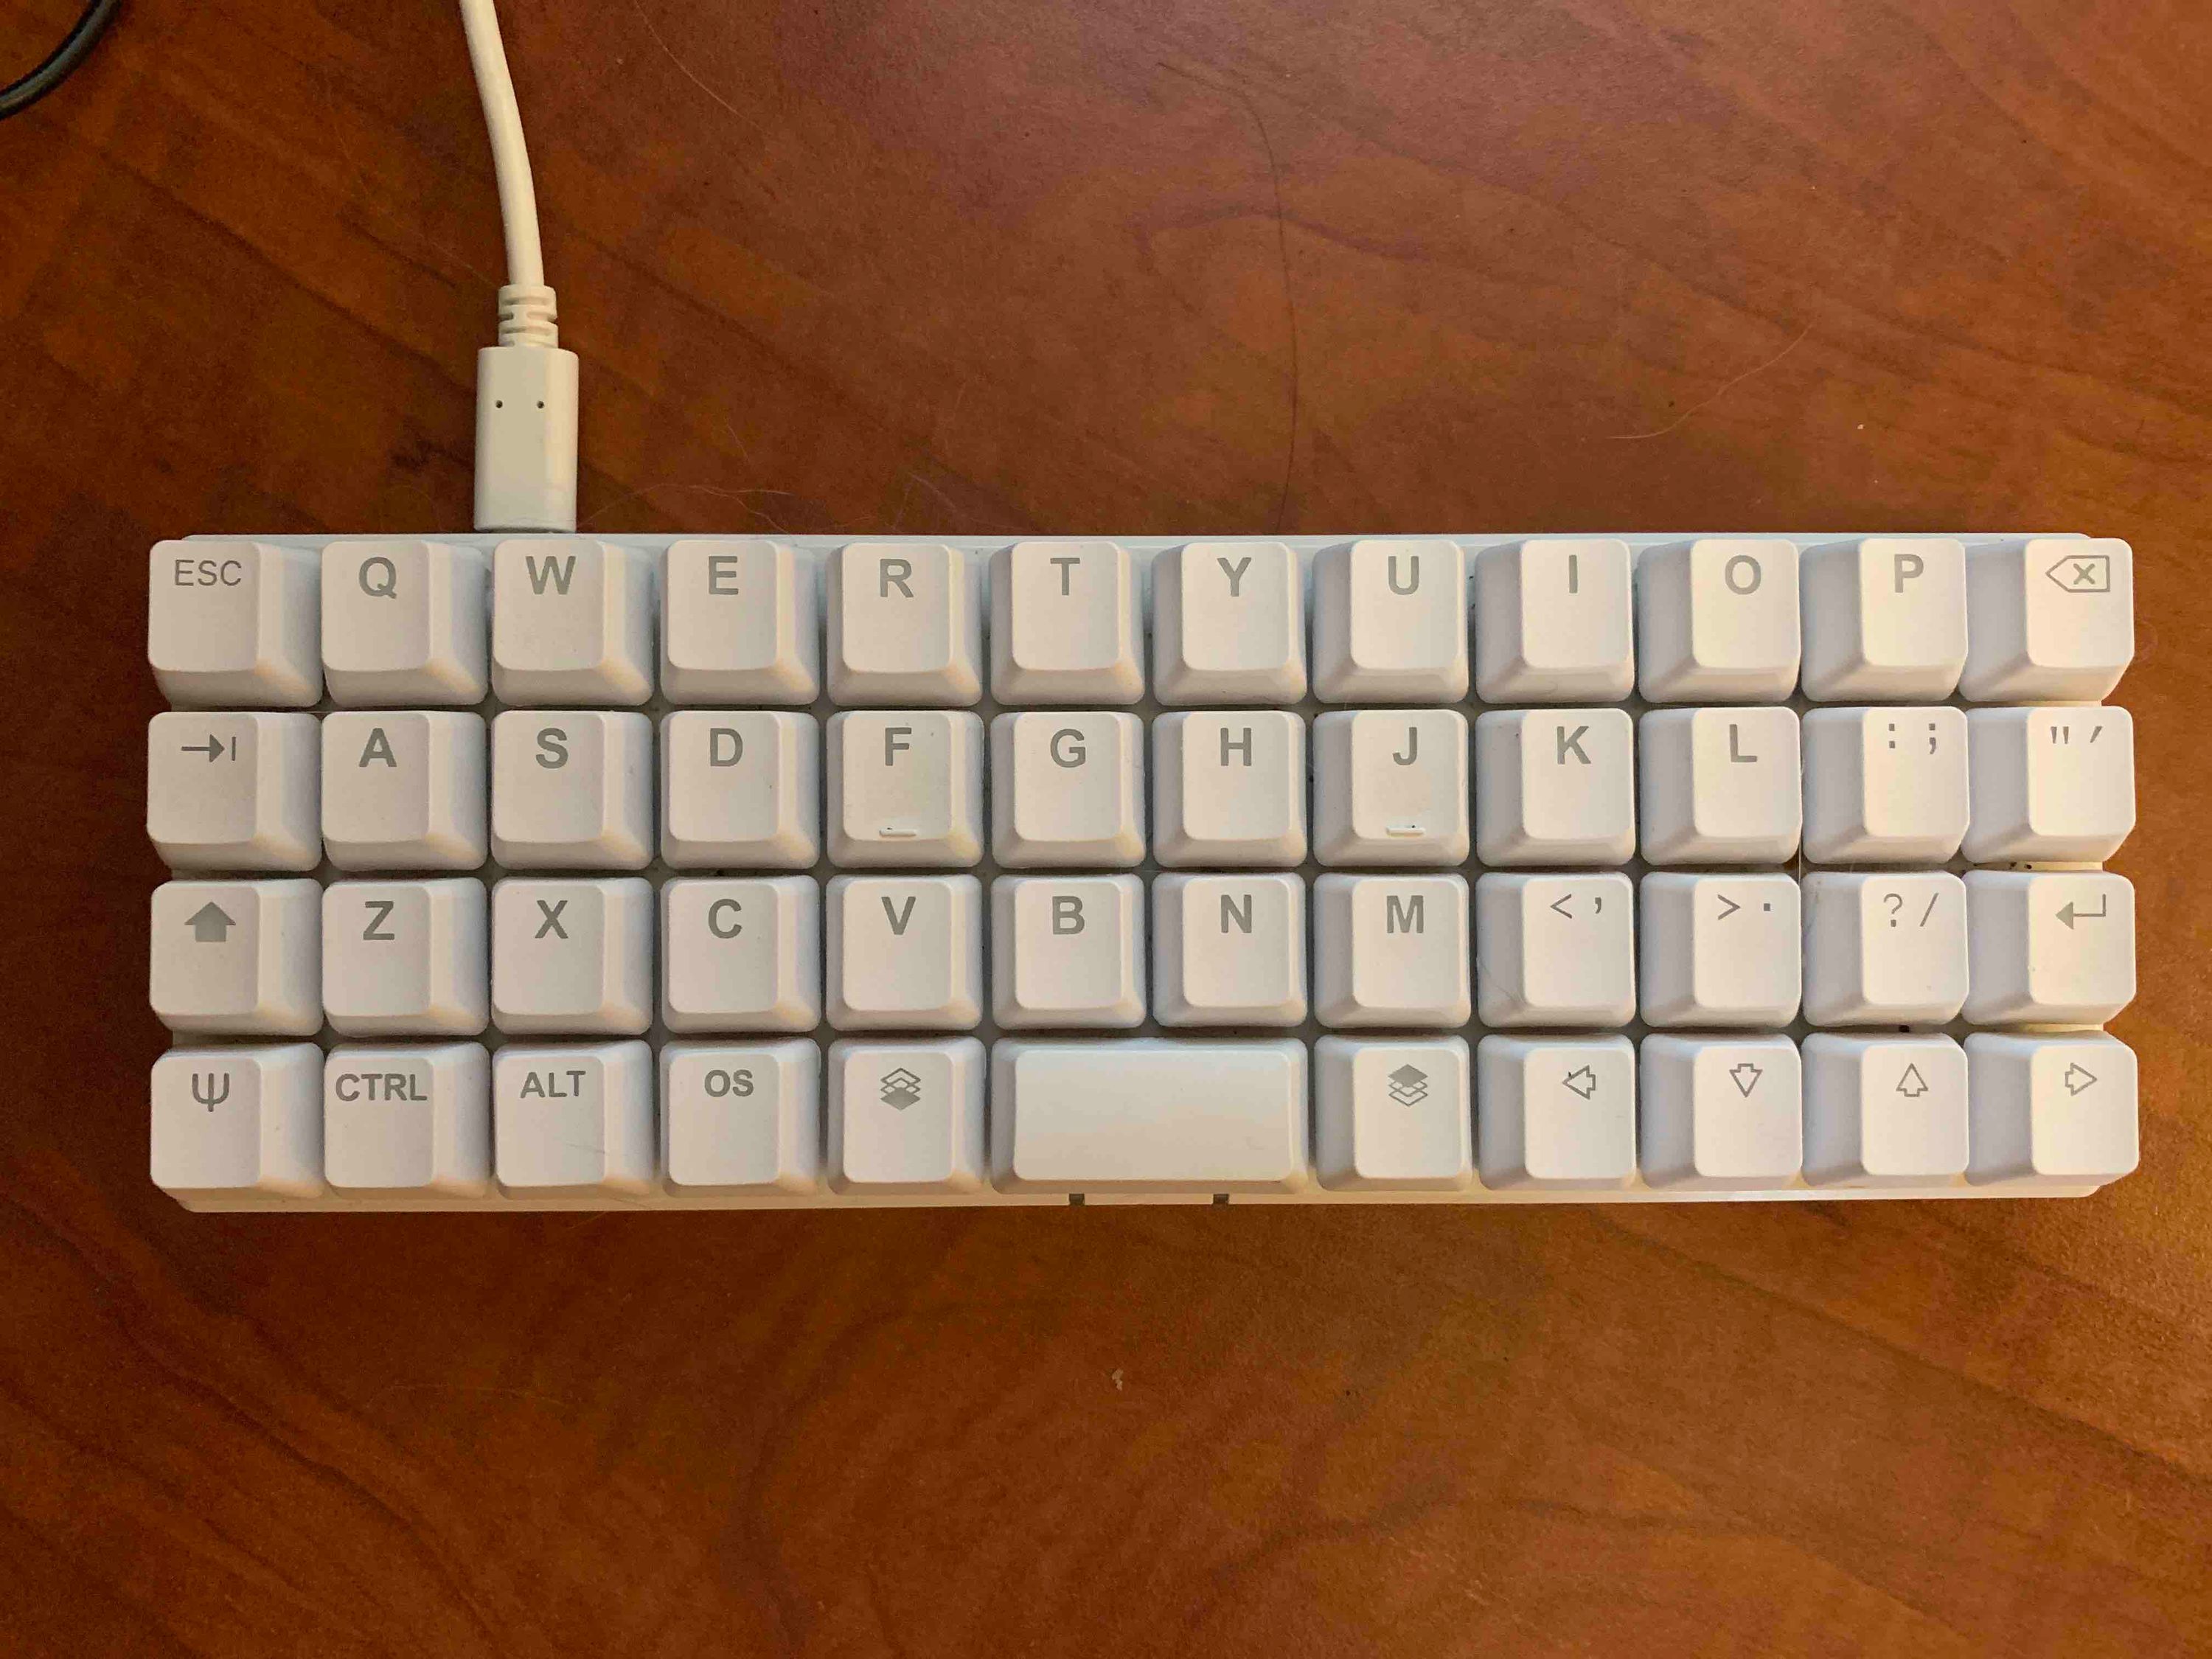
Without the light show, it is pretty. This is a wired keyboard. No Bluetooth. Works with USB Type C and USB Type A.
You have a choice of 8 Cherry MX Switch varieties and 5 Kailh Switch Varieties. The switches are hot-swappable, you can mix and match if that is your wish. I got the Cherry MX Browns. They are quieter than the Blues and I like the feel of them. I don’t know about the Kailh switches, I stuck to the familiar Cherry switches.
Making the Keyboard Your Own
With only 47 keys, you have to make space for the other keys. The Planck does that with layers. See the keys on the left and the right of the diminutive spacebar? Those are the keys you use to switch layers. The default setup comes with 4 layers:
- A lower layer is accessed by pressing and holding the left layer key.
- A raised layer is accessed by pressing and holding the right layer key.
- The base layer, and,
- The adjust layer is accessed by pressing and holding both the left and right layer keys.
You can add layers to the configuration. 28 more (for a total of 32). That is more layers than I can manage. I am still using the default layers and have not ventured away from that. Need to get used to the location of the keys I have set up before I make more layers.
The Oryx configurator is what you use to configure the keys. You can find my configuration here. You can add a spot color to individual keys to use as identifiers. The configuration is easy. You modify the layout, you download the configuration to your computer. You drop the configuration on Wally. And let Wally flash your keyboard.
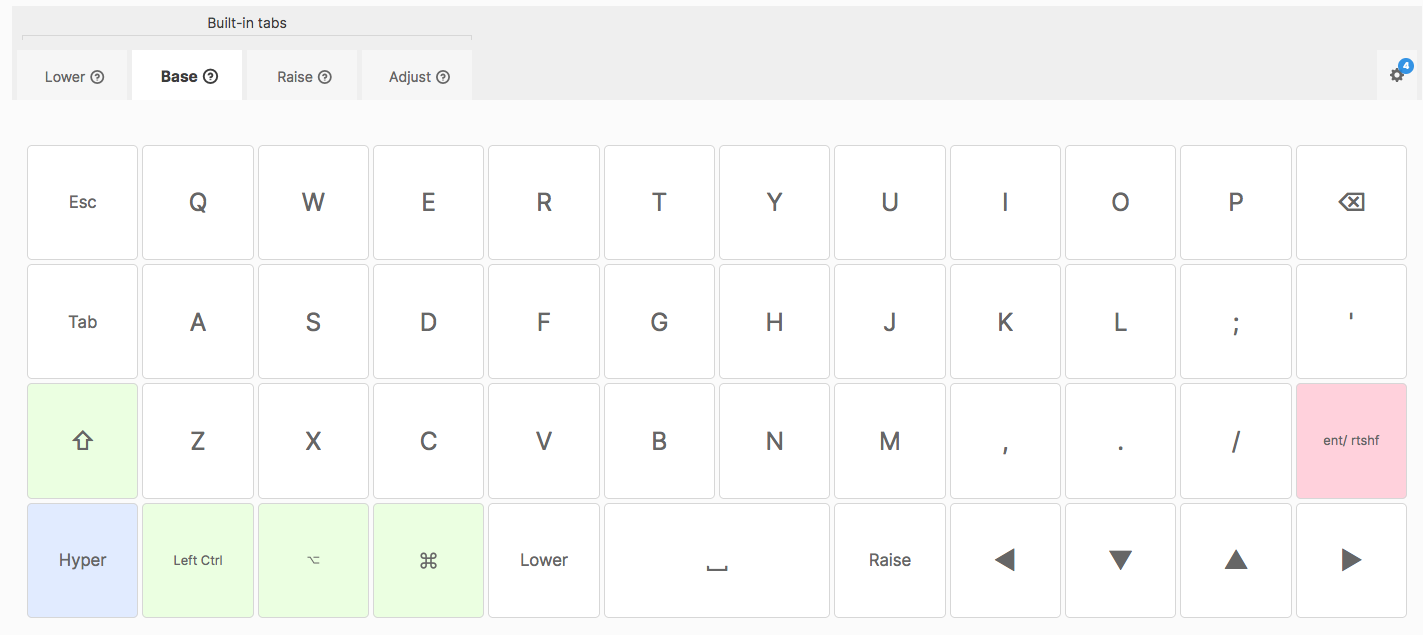 The base layer
This is my base layer. Pretty standard. I added the Hyper key. I use that a lot. Also customized the Enter key. It is Enter if it is tapped and the Right Shift key when it is held down. Not sure that I need that anymore, having discovered the joys of Auto-Shift. More on that a little later.
I was already getting used to the VIM directional keys (h,j,k,l) so the arrow keys in a line don’t seem to bug me as much as I thought they would. I am still getting used to the placement of the Tab and the Esc key. Debating whether I should switch them around. Other than that, the base layer is perfect.
 The lower layer
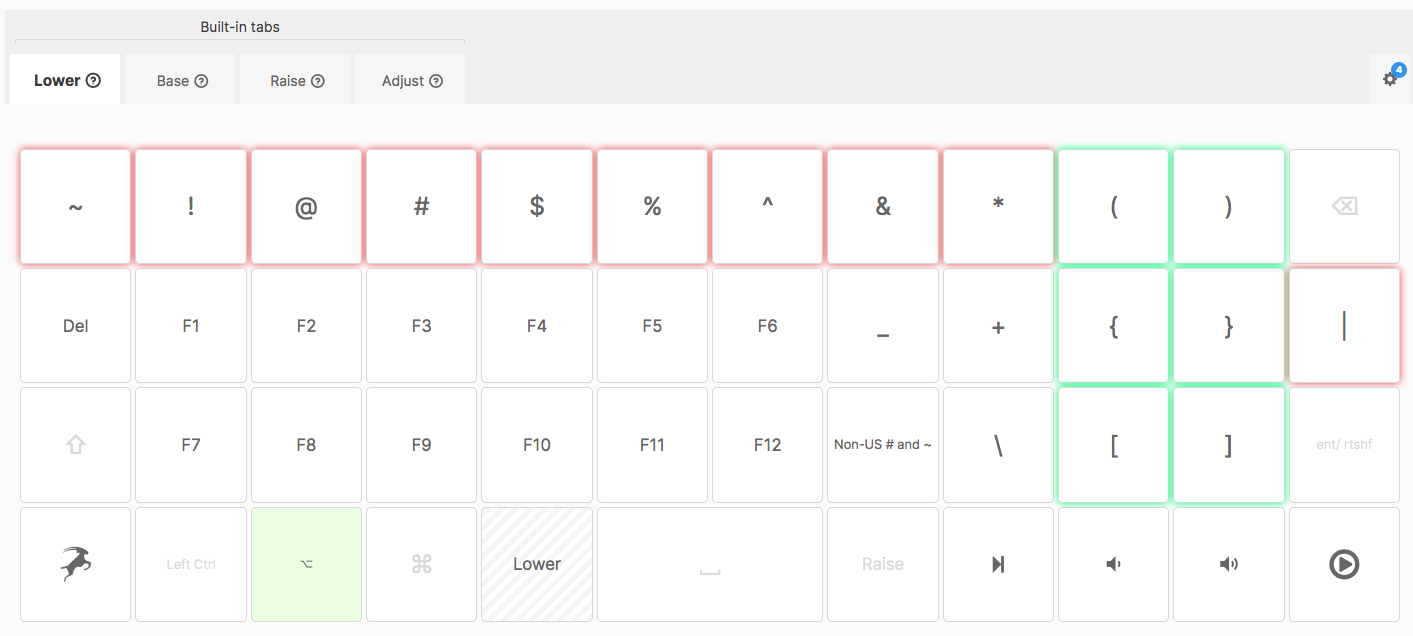
The lower layer. The cluster of brackets gets a lot of use. They are colored differently from the other keys. Might consider different colors for the # and * keys to be easier to locate. Those keys get used extensively when I am writing in Markdown (which is all the time). There are some media keys on the bottom right. They get a fair amount of usage. The Oryx key is on the bottom left. Not sure whether that is useful at all, I haven’t used it in the time I have had the keyboard.
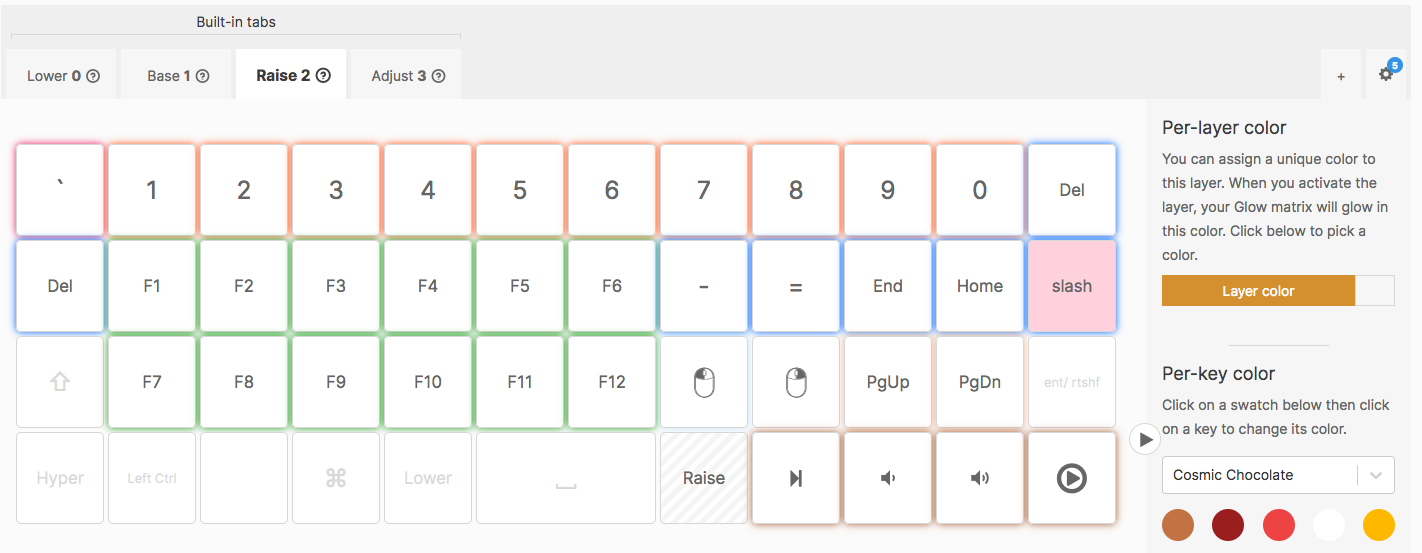 The raised layer
The raised layer. The numbers are on the top. The End/Home/PgUp/PgDn cluster is useful. Some more media keys at the bottom right. The slash key is a toggle between the backward and the forward slash. The Planck simulates some mouse controls. Left and right-click with the mouse is on this layer.
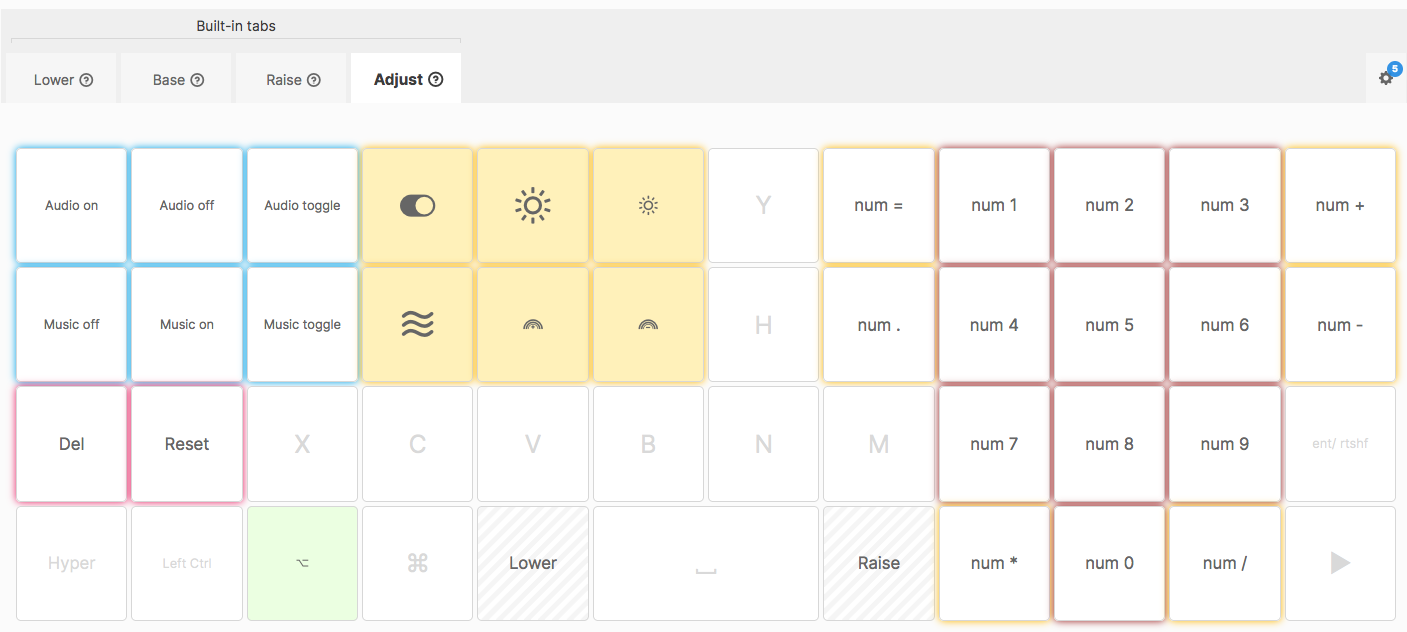 The adjust layer
The adjust layer. You get this by holding down the raise and lower keys. I like the number pad, that is here. There are some hardware toggle keys to turn on/off backlighting and other adjustments to it.
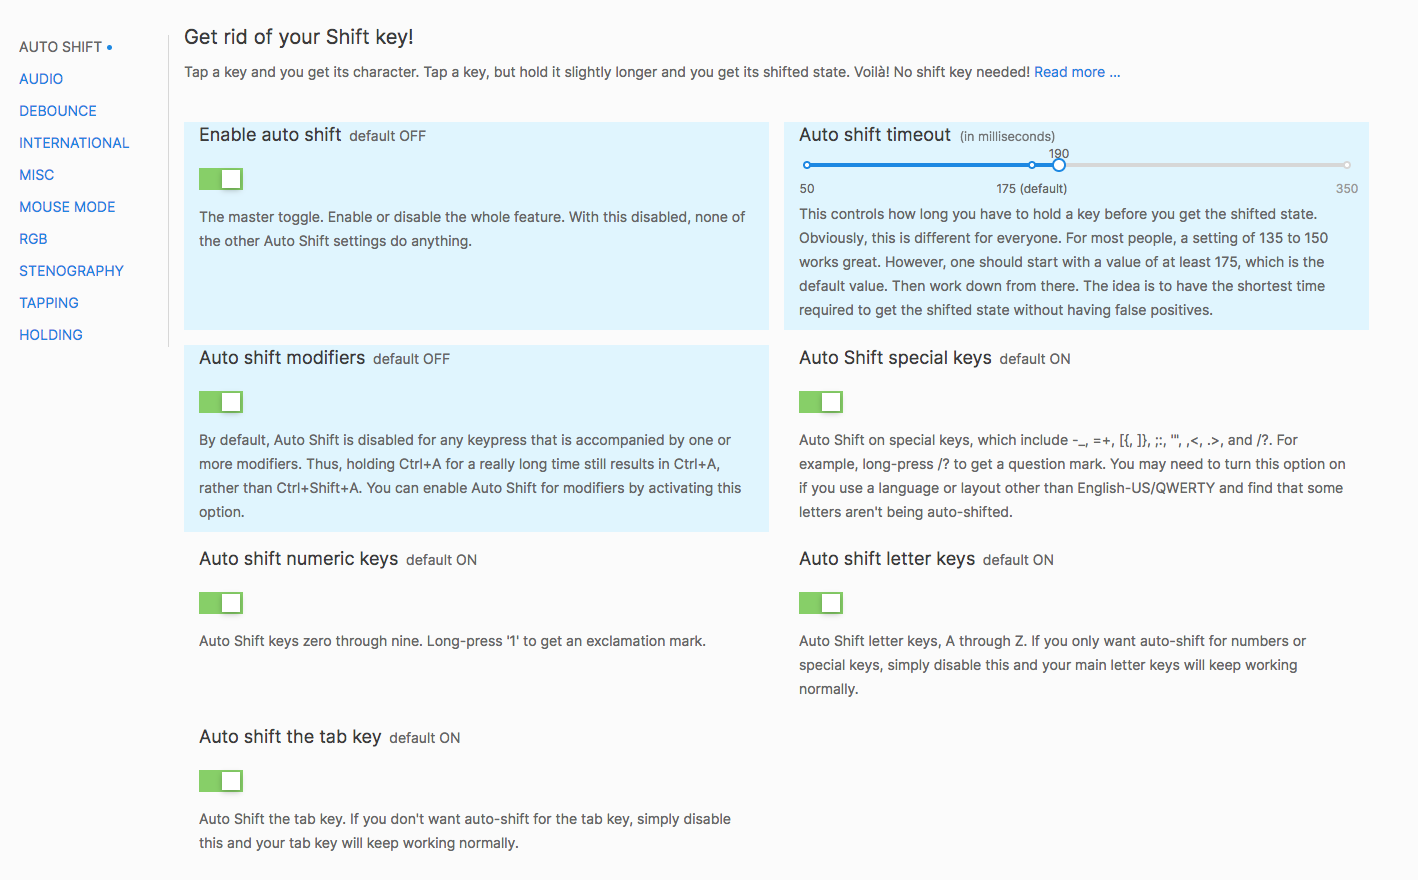 The advanced settings
The advanced settings. Auto-Shift is a fantastic feature. A long press on a letter key and you get the capitalized version of the letter. Makes typing a lot more fun. I am in love with Auto-Shift. Makes it difficult to use another keyboard after getting used to this, it has made me type so much better. I have Auto-Shift turned on for everything and it is a feature I am using extensively.
Some Comments on Usage
I didn’t take any formal instructions on how to type. I learned by chatting on IRC and BBS’es when I was almost thirty years old. I have lots of bad habits. I am sure I use the wrong finger for particular keys and am not efficient at typing. When I first got the keyboard, it was a right mess. Couldn’t type on it without bunches of mistakes. It was a difficult two weeks. It got better the more I used the keyboard. It is still not perfect, but it is not a frustrating exercise anymore. I can instinctively keep on putting words on the screen without thinking about where the keys are. That is a noticeable improvement.
The Planck is habit-forming. Moving from it to the Air keyboard is an absolute nightmare. Mistakes galore. Auto-Shift compounds the problem.
Once you get used to it, The Planck is a joy to type in. I am slowly getting there. Why are all keyboards not like this? Auto-Shift, the ability to customize the keys, and the color-coded keys make the Planck a worthwhile investment for me. The ortholinear setup is something that took a little getting used to, but I have no pain in my hands now. I can type on this the whole day, and I do, every day, with no pain.
Conclusion
If you are not constrained by space or money, you might consider the ErgoDox EZ: An Incredible Mechanical Ergonomic Keyboard or the ZSA Moonlander: Next-gen Ergonomics | zsa.io | Store. But if you are looking for something smaller and cheaper, the Planck is a great alternative.
I am ecstatic with my use of the Planck. This is turning into a workhorse and I am enjoying putting words on the screen with it.
I have to thank Matt Gemmill for the inspiration. He wrote three articles on the Planck and they helped me:
- The Planck Keyboard - Matt Gemmell
- 40% Keyboard Layout for Writing - Matt Gemmell
- Compressing Your Keyboard - Matt Gemmell
Thank you Matt. And thank you ZSA Technology Labs, Inc. for making a good product.
macosxguru at the gmail thingie.