 Bicycle For Your Mind
Getting Comfortable With the Finder
Finder
 Finder
This is the application where you interact with your files and folders. It is a key component of the macOS. You are going to spend a lot of time here, get familiar with it.
Finder Window
You can open a new Finder window in a variety of ways:
- Click on the Finder icon on the Dock.
- Choose Finder>File>New Finder Window.
- In the Finder, type ⌘ + N.
Get used to the keyboard command: ⌘ + N. Learn it. New Finder Window: ⌘ + N.
Learn some keyboard commands. Why? They are the convenient way of using the computer. Ninjas use keyboard commands. Newbies use mice/trackpads and menus. You might be a newbie today but you are working towards achieving ninja status. Learning keyboard commands is an essential part of that journey. Let's get to work.
Finder Views
You can set the view in a Finder window. You can choose:
- Icon view activated by keyboard command ⌘+1
- Column view activated by keyboard command ⌘+2
- List view activated by keyboard command ⌘+3
- Cover Flow activated by keyboard command ⌘+4
You can check out how the views look, by using the keyboard commands. Have you checked them out? Good. You are going to be in List view most of the time. You are going to be in Cover Flow mode for specific tasks. If you are going to look at a folder of pictures, Cover Flow mode is useful.
Finder Items
The Finder has two kinds of items: files and folders.
There are a few types of files. The major ones are:
- Application files. These are the applications which are installed on the Mac. You can buy and install applications from the App Store or on the Internet. You can launch them, by double-clicking on them in the Finder with your mouse, or highlighting them, and then pressing the keyboard command ⌘ + Down Arrow, or ⌘ + O (Open).
- Data Files or Document files. Applications create these files. You create Word documents in Word. Text files in your text editor. Image files through an image editing program, and so on. You are going to be creating a lot of these document or data files and working with them.
- Archive files. These are bundles of files or folders created by compressing them together into one file. Commonly zip files, these are used primarily as a backup option or an easy way to transfer a bunch of files between one computer to another.
- Disk Image Files. This is another kind of bundle. Produced to make it possible to install applications or transfer a bundle of documents from one source to another. When you come across a disk image file, double click on it, or highlight it and hit ⌘ + O, or ⌘ + right arrow, and the disk image launches like a drive on your computer. Usually this is a secure way of transferring applications and its associated files from the developer to the user.
Folders are created by the user. Folders are just what they sound like. They are an organizational tool to corral similar files together or corral all the files related to a project into one collection. Say you are working on a class presentation: you have a Keynote file, a Pages file, a bunch of images, an outline file, all related to the same presentation. You can choose to create a folder in your Documents folder, call it by a name you deem fit, and then put all the files related to the presentation in that folder. In the Finder, you make a folder via the keyboard command ⌘ + ⇧ + N.
I am going to repeat that: Make a folder in the Finder: ⌘ + ⇧ + N
Sometimes when you make a new folder in the Finder, the name doesn't stay highlighted, letting you name the folder, instead you are given a folder called "untitled folder". Just select the "untitled folder" and hit enter. The name will be highlighted, type your desired name and you are ready to go.
File System
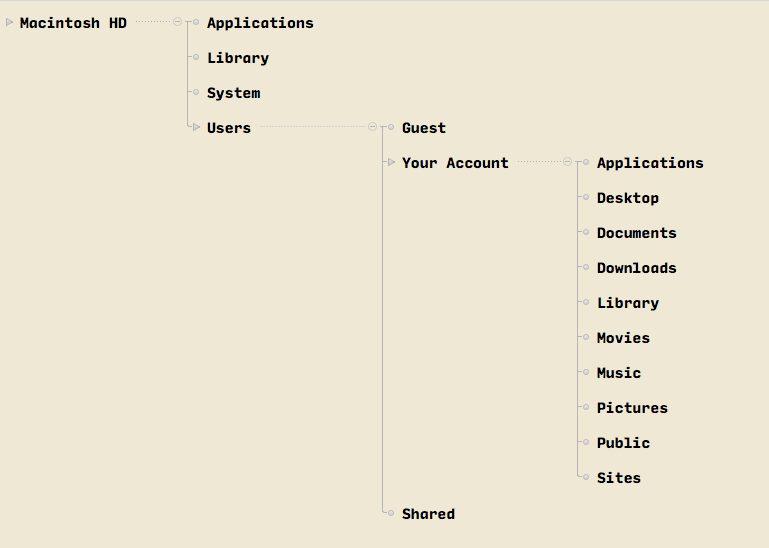
Before we go any further, I am going to run down the organization of the folders and files on your computer. When you highlight the Hard Drive on your Mac, this is the folder hierarchy which appears:
 Macintosh HD
Four folders. We are going to ignore two of them: Library and System. These are the System folders and we are going to pretend they don't exist. If you know what is contained in these folders, you are not a newbie. What are you doing reading this article? The two folders we are going to be concerned with are Applications and Users.
The Applications folder contains applications which are available for us to run. This is the main Application folder, applications installed in this folder are available to all users of the machine.
 Users Folder
The Users folder is user specific. By default, the Users folder contains three sub-folders: Guest, Shared, and Your account (signified by the user name you chose). We are going to deal with the Guest and Shared folders in a later post. For this article we are going to concentrate on your user folder.
Your User folder contains an Applications folder. If you have multiple users on the Mac, then it makes sense to have some Applications which are run by some users and not by other users. Those individual specific applications can be installed in the users Application folder. If you do not have multiple users on the Mac or any individual specific applications, you can just install all applications in the System Applications folder and not worry about Users Application folder at all.
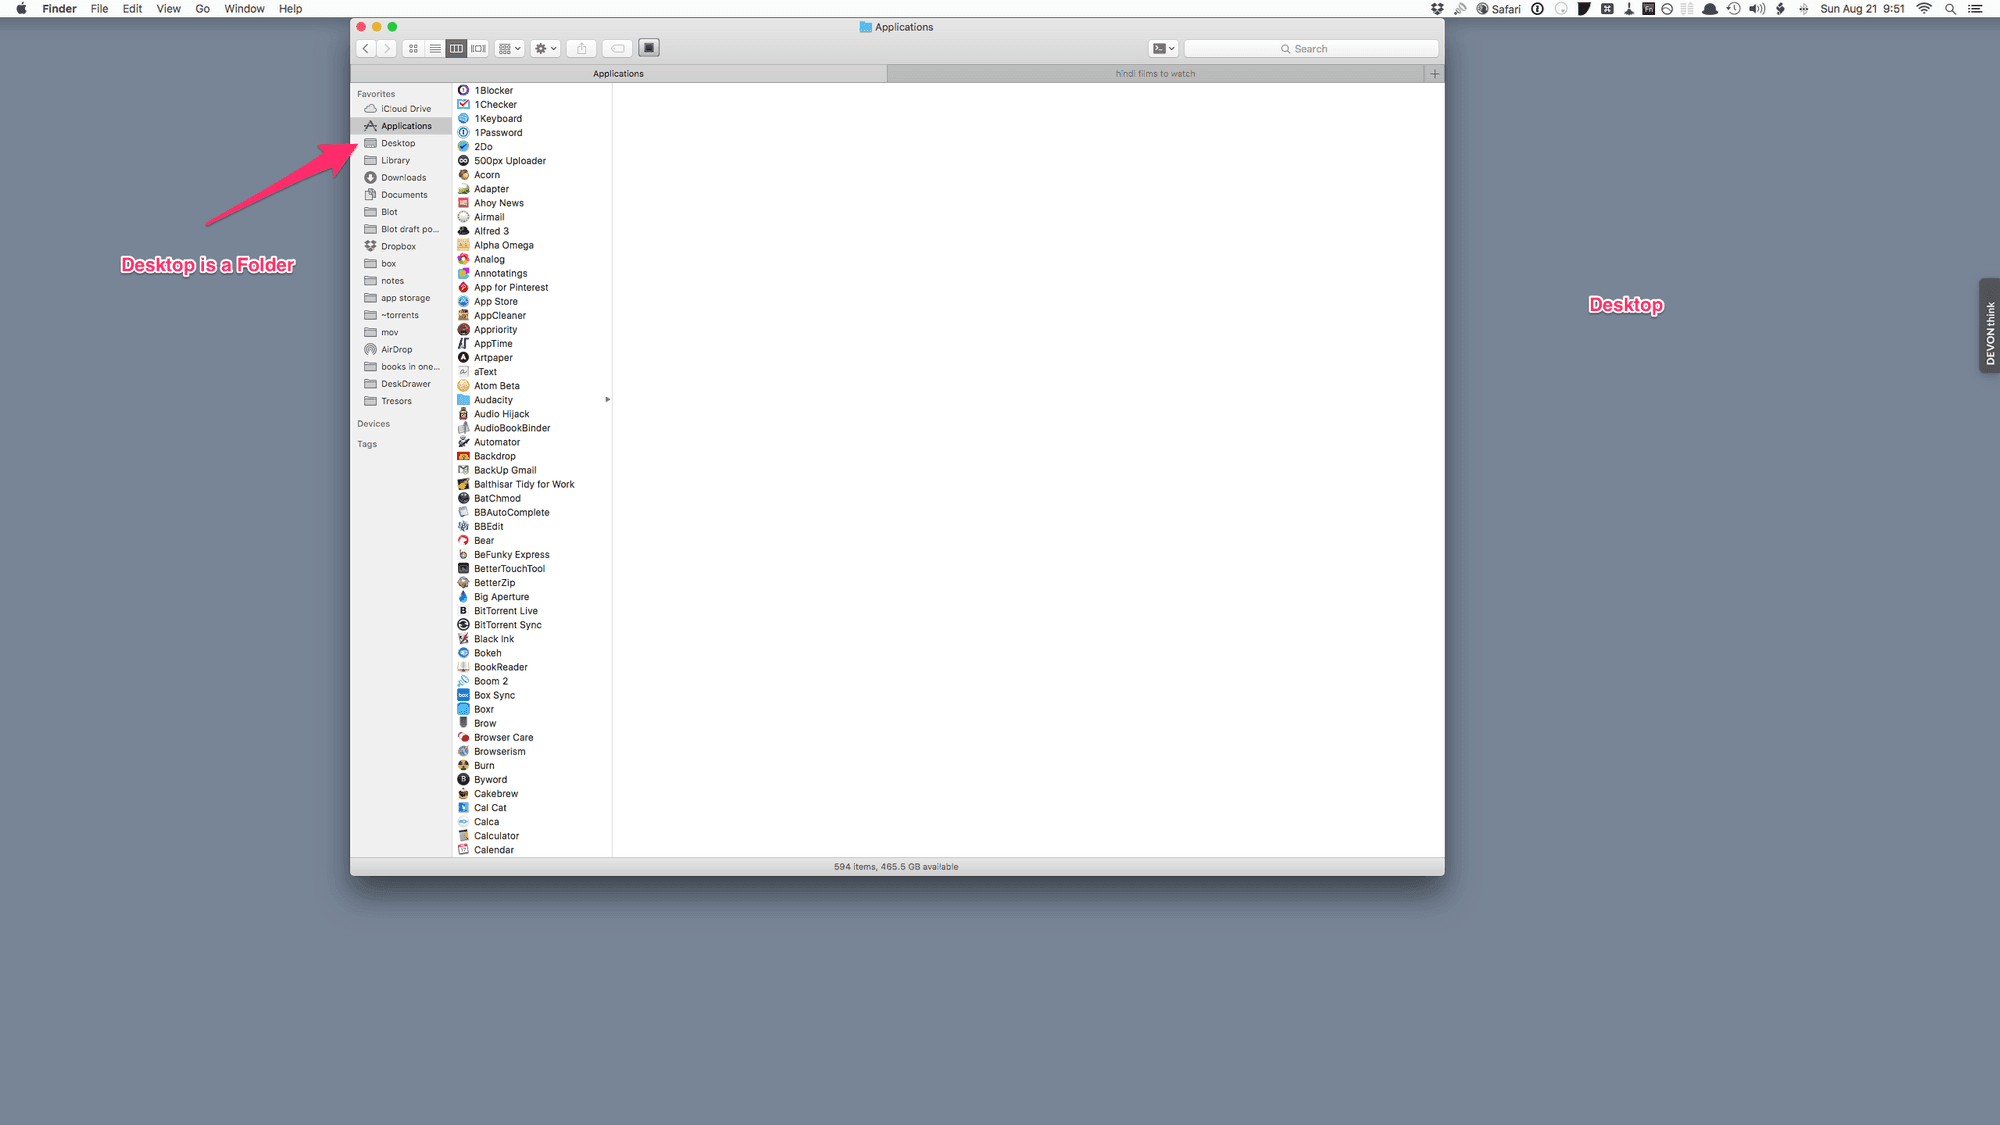 Desktop
Your User folder contains the Desktop folder. Did you know that the Desktop is a folder? It is. It is a special folder which provides the background for your Finder windows. People use the Desktop as a place to keep a bunch of files which they are working on and it gets unruly quickly. You are better off learning the file system to store files in their proper place and this added organization is going to make you more productive.
The User folder contains a Documents folder. This is where you are going to keep all the documents you create. You can organize files within this folder anyway you want. You can have a project based organization: all files related to a project are in its own project folder. Or you can have an application based organization: All Pages files in its own folder, all Numbers files in its own folder and so on. You can have a mishmash of organization schemes: Some project based folders, some application based folders, and some free-standing files.
I am going to take a break from this section and explain the benefits of organization to you. I will come back to this section after I have done that.
Why Is It Necessary to Organize Files and Folders?
Apple seems to believe that with Spotlight having gotten so efficient, you do not need to organize files in folders anymore. You can just dump everything into the Documents folder and tag them to facilitate search and retrieval. I am not a fan of that system.
- I am not happy with the tagging systems in use.
- I am forgetful and don't necessarily remember to tag files when I create them. So, half of my files end up having tags, and half of them have no tags.
- I am not convinced that the tagging system is any better at organizing files than folders. Folders are just there. Tags you have to remember. I try to reduce the number of things I need to remember. So the tags based file structure is not for me.
Have a system. Any system will make your life easier. Project based folders containing files which are linked to a particular project make it easier to find and work on files related to a particular project. You are not going to have to keep all your files on the desktop because you are working on them. You know the project you are interested in: Global Domination 2017. Look for the folder with that name, in the Documents folder, select the file/s you want to work in within that folder, open them, and you are ready to commence work.
Keep files in folders. Name the files and folders with descriptive names. Remember that you are a productive person, so very soon, you are going to have a whole bunch of files in the Documents folder and the only one who knows what they are, and more importantly, where they are, is you. Come up with an organization system which makes sense to you, follow it.
Selecting Files
You can select all files in a folder by the Select All command. The keyboard command is ⌘ + A.
You can select multiple files in a folder by ⌘ + Clicking on the files you want to open. So, hold down the ⌘ key and click to select each individual file you want to open. This makes sense if you have a few files to open, sometimes you are opening a bunch of files, and they are not in sequence. You might have the following sequence of files you want to open in the folder: The first four files, the sixth file and the eight file in a list. Click on the first file, hold down the Shift key and click on the fourth file, all four files are highlighted, this is how you select contiguous files. Let go of the Shift key and hold down the ⌘ key, and select the sixth and eight file that you are interested in. Now you have your files selected, hit ⌘ + O. The selected files will now open.
File System Continued
Your User folder will contain a Downloads folder. All the files you download from the Internet reside in this folder. You might download application image files, or application installation packages, or documents and images which you are working on with your co-workers. All of those files are waiting for you in the Downloads folder. You can move the documents and pictures into project files in your Documents folder or make new folders in your Documents folder and move them there. You can install the applications that you have downloaded.
Again I am going to take a break from the File System and come back to it after the following section.
Installing Applications
The easiest way of installing applications is to buy them from the Mac App Store. You press buy, and the application gets installed and you have nothing else to do but run the application which is installed in the Applications folder.
You can download an application from the Internet. A good site to keep bookmarked in your web browser is Apple Mac OS X Software & Apps - Discover & Download : MacUpdate. Applications available on the Mac are listed here. Small and big software vendors provide applications for the Mac not available in the Mac store. Some of these apps are free. Some of them you have to pay for. They are distributed in the following forms:
- Disk images. You download a disk image. You double click on it and it mounts on the desktop. Usually has an application file which you drag to your Applications folder. Sometimes it has an installer. Double click on the installer, follow the prompts and the software is installed.
- Zip file. Some applications are distributed in a zipped file. Select the zipped file in the Finder. Right click on it, choose Open with, and the first item on the drop-down menu should be Archive Utility. Choose it. The file is unzipped usually in a folder or in some cases, the unzipped file is the application you were installing. Double-clicking on the zip file would have the same effect of unzipping the file. Move it to the Applications folder and run it, by double-clicking on it or pressing ⌘ + O.
- Installer package. Sometimes the applications are distributed as installer packages. Double click on them. Follow the prompts. It will install the application in the Application folder.
Back to the File System
In addition, the Users folder contains the following folders: Movies, Music, Pictures, Public and Sites. These are file-type specific folders. For instance, when you buy and download a movie from the iTunes Movie store, your movie will be in the Movies folder. The same thing is true of the Music folder. Movies and Music are integral to iTunes and you will use them through iTunes. The Pictures folder is similar in that Photos will handle your Pictures folder. Public and Sites are folders we are going to ignore for a later article.
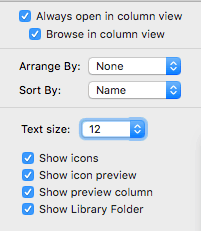
There is a folder in your Users folder which Apple hides. It is called Library. It is an useful folder and you should make it visible. This is how you do it. In the Finder, highlight the User folder. Select the Menu item View>Show View Options or press ⌘ + J.
 Library Folder
Click on the box next to Show Library Folder. Now the Library folder is visible. This is an important folder. Don't delete anything from this folder unless you know exactly what you are doing. This folder contains some settings for your system, settings for your applications and useful things like the Services installed in your machine, the fonts that you install, and a whole host of other stuff. We are not going to do much to this Library folder but we are going to use it to do some good stuff like add fonts and so on. Just keep it visible. Pretend it doesn't exist and only interact with it when you need to.
I think you have the basics down at this point. Start using the computer and we are going to come back with future articles which deal with some other issues of working in the Finder.
macosxguru at the gmail thingie