![]() Disk Utility
Disk Utility
Adding Keyboard Commands to Disk Utility
The Disk Utility app has been redone in El Capitan. It now has the ability to fix a hard drive even when it is the boot volume. It has also lost the repair permissions function. I am assuming that Apple thinks that it is not necessary anymore. Worryingly it has also been redesigned without keyboard commands. We need to fix that.
No Keyboard Commands for you
I am going to show you how to add keyboard commands for three menu items: Mount, Unmount, and Eject. Mount and Unmount are a toggle. When a disk is unmounted, the Mount function is active. When it is mounted, the Unmount function is active. Eject works well with disk images.
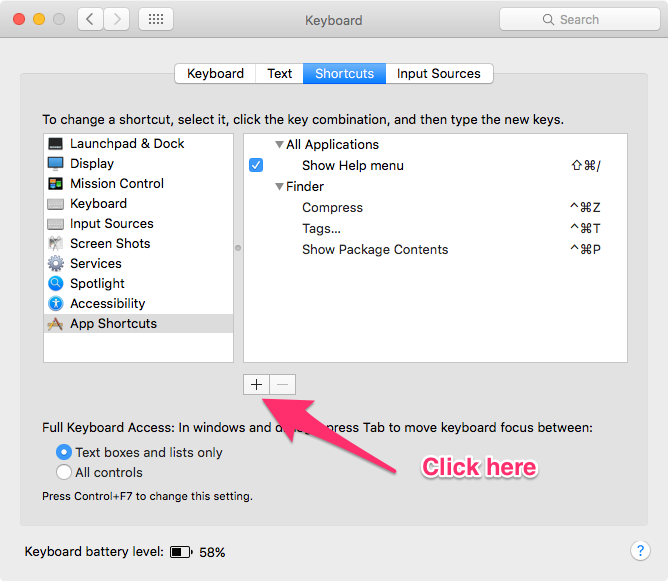
Launch System Preferences. Go to the Keyboard preference pane. Choose App Shortcuts from the left menu. Now click on the plus sign.
 Click on plus sign
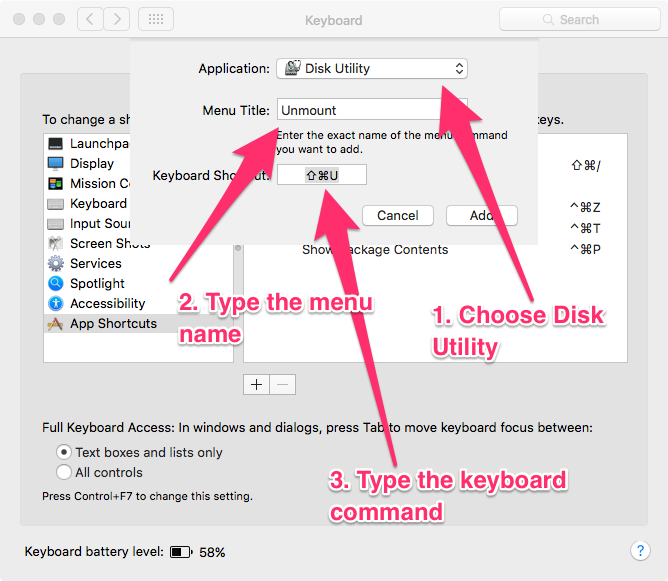
You are going to get a popup sheet from the top of the window. The Application pop up menu should have Disk Utility listed, choose it. If it doesn't go to the bottom of the list and choose Other…. It will give you a Finder window. Go to the Utilities folder in the Applications folder. You will find Disk Utility there. Select it. Type in the menu item name that you want to add a keyboard command to: In this case, it is Unmount. Add the keyboard command, ⇧ + ⌘ + U. Click on Add and you are done.
 Unmount it
Now add another, Mount, follow the same procedure. This time Add Mount to the Menu Title and the keyboard shortcut ⇧ + ⌘ + M.
Mount it
The last one. Same routine. Add Eject to the Menu Title and the keyboard shortcut ⇧ + ⌘ + E.
Eject It
This is how the shortcuts menu looks when you are done.
Disk Utility Redone
We can now add keyboard commands in this way to any menu items which don't have them. You can see the keyboard commands I have added to the Finder in the screenshot above. I leave it as an exercise for you to add those on your own.
Note: Sometimes menu items have the ellipsis following them. You type an ellipsis on the Mac by typing ⌥ + ;, like this…
macosxguru at the gmail thingie
Disk Utility Keyboard Commands