February 8, 2017
PDF Converter Ultimate Does Conversions on iOS
 App Icon
Product: PDF Converter Ultimate
Price: $9.99 for individual type of conversion or $49.99 for all of them.
The convert to and from PDF seems to be an active product category and there are a bunch of players in the space. I have covered products in this category before Able2Extract Professional 11 Slings PDF Files Around Like a Boss - iPadpedia, and Convert PDF’s to Word - iPadpedia.
 Converter File Location
PDF Converter Ultimate being an iOS product interested me. It converts files to and from PDF. It is comfortable with a host of file formats and is good at the conversions. You can convert files which are hosted on your device or from a slew of cloud services, including Box, Dropbox, Google Drive or OneDrive.
Interestingly, the files are uploaded to the Cometdocs servers, and the conversion is done there and then pushed to your iOS device. The heavy lifting of the conversion is handed over to the servers and that means that your iPad battery and speed are not important to the conversions. It is an efficient way of dealing with the conversions. The files once pushed to the iOS device are deleted from the servers.
 Converter Dropbox
You point the program to a cloud service, in my case, it was Dropbox. The contents are listed. You pick one.
 Converter Dropbox File
The content of the files is shown in the window. You press Convert, the button on the top left.
 Converter Convert
That gives you a drop down menu of your choices.
 Converter Share
After converting you have the ability to share the document through the share menu of iOS.
Conclusion
PDF Converter Ultimate does a good job of converting regular documents and scanned documents.
When you need the ability to convert to and from PDF files to a plethora of formats on iOS, PDF Converter Ultimate is a good choice. It is recommended heartily.
A complimentary copy was provided by the developer looking for a review of the product.
macosxguru at the gmail thingie
PDF
iOS
February 5, 2017
Curio Helps You Think Things Through
 Curio Icon
Product: Zengobi Curio - Note Taking, Mind Mapping, Brainstorming
Price: $59.99 to $139.99 (Price for academia $89.99)
Curio is a strange beast. It is unlike any other application available on the Mac. It is a collection of tools to help you in your quest to produce content, think things through, and manage your life.
What makes Curio unique is two things:
- Curio tries to implement in one application, tasks which are attempted by a host of single feature applications. Curio has a mind map component. It has an outlining component. It has an Index Card component. These are tasks usually performed by a dedicated application. In Curio, these are all available for you to work with.
- It provides you a freeform canvas where you are not constrained in any way. There are no restrictions to how you want to achieve your project goals. You have at your command a plethora of tools and you get to choose to mix and match those tools to achieve your goals.
Once in a while, you run across an application which is going to change the way you work. Significantly change the way you work. Thankfully doesn’t happen too often (that would freak out old people like me) but when it does, there is an excitement which hits you. You are on the precipice of forging into new territory, of traveling into a workflow where there will be new things to learn and experience but there are also going to be productive results from the learning. Curio gives me that feeling. It is a new way for me to experience the process of writing. Of thinking. Of exploring what the nuances are, what the dimensions are and they can all be in one space in one application, and I can be immersed in it. Because it is all available in the same application, I find that I am more likely to use them, I am more likely to give myself the opportunity to take the time to think about it. Take the time to organize my thoughts better. Curio has the potential of improving the quality of my
content and that is something I am grateful for.
Review of Curio
Zengobi was very kind to provide me a license for Curio with the idea that I would review the new version 11.0. So here is the review.
If you are a person who is producing content. Any content. If you feel that your content can be improved by thinking things through, you should try out Curio. It has all the tools necessary to help you in the process of thinking, producing and managing your content related workflow.
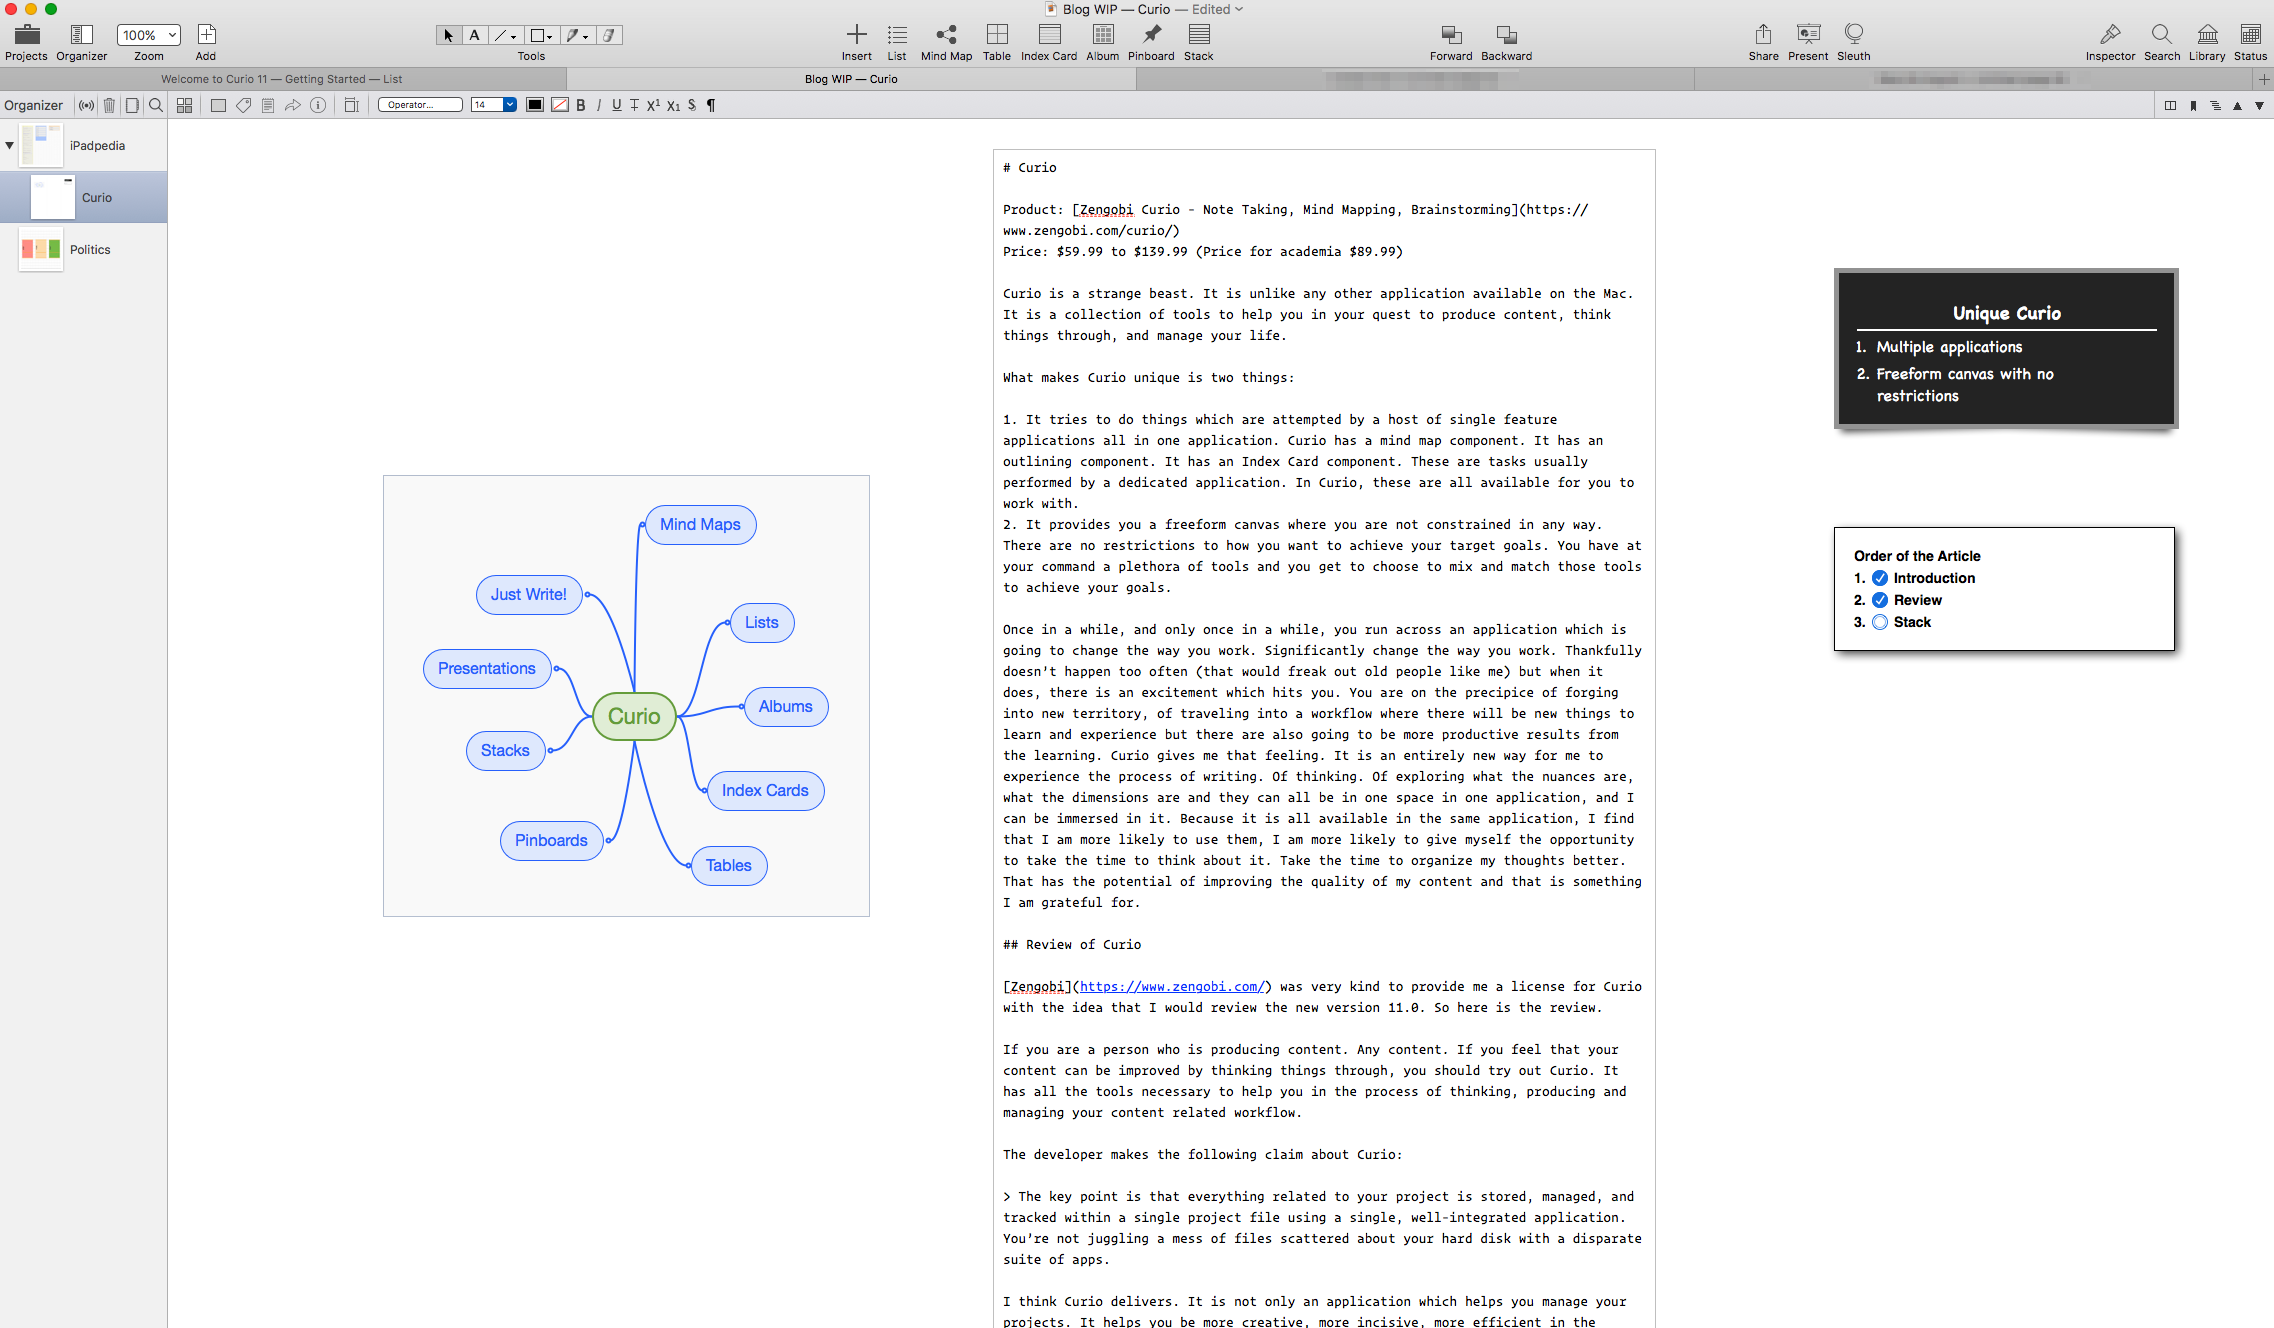 Curio Working Window
While writing this article, this is how the window in Curio looked like. I am used to writing in iA Writer. iA Writer is a program where this article is going to end up, but in the act of writing in Curio, I find that I can move the process along by making a few mind maps or lists to help the process. To clarify my thinking. Curio through its set of integrated tools makes that process easy and efficient.
The developer makes the following claim about Curio:
The key point is that everything related to your project is stored, managed, and tracked within a single project file using a single, well-integrated application. You’re not juggling a mess of files scattered about your hard disk with a disparate suite of apps.
Curio delivers. It helps you manage your projects. It also helps you be more creative, more incisive, more efficient in the production of the content which is the central component of your project management. I have just started scratching the surface of this product and I am excited by the potential it shows.
Curio is available in three editions with prices ranging from $59.99 to $139.99. The features of each of these versions are listed on their site. Pick the flavor you prefer. I am covering the Professional version of the product.
Curio has the potential to change your life. It is heartily recommended.
Stacks of Tasks to Be Done
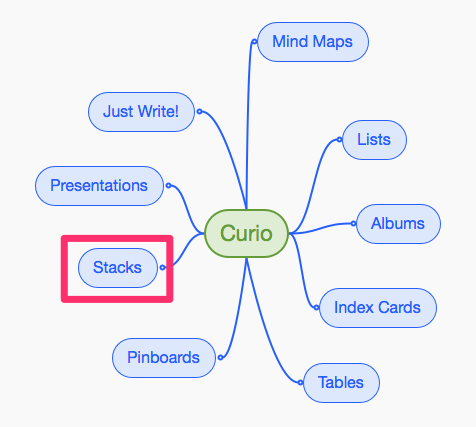 Curio Mind Map
Curio gives you access to several tools. I am going to concentrate on one of them for this article, Stacks. I will write follow-up articles on the others in the coming months.
Stacks are a great way of organizing tasks.
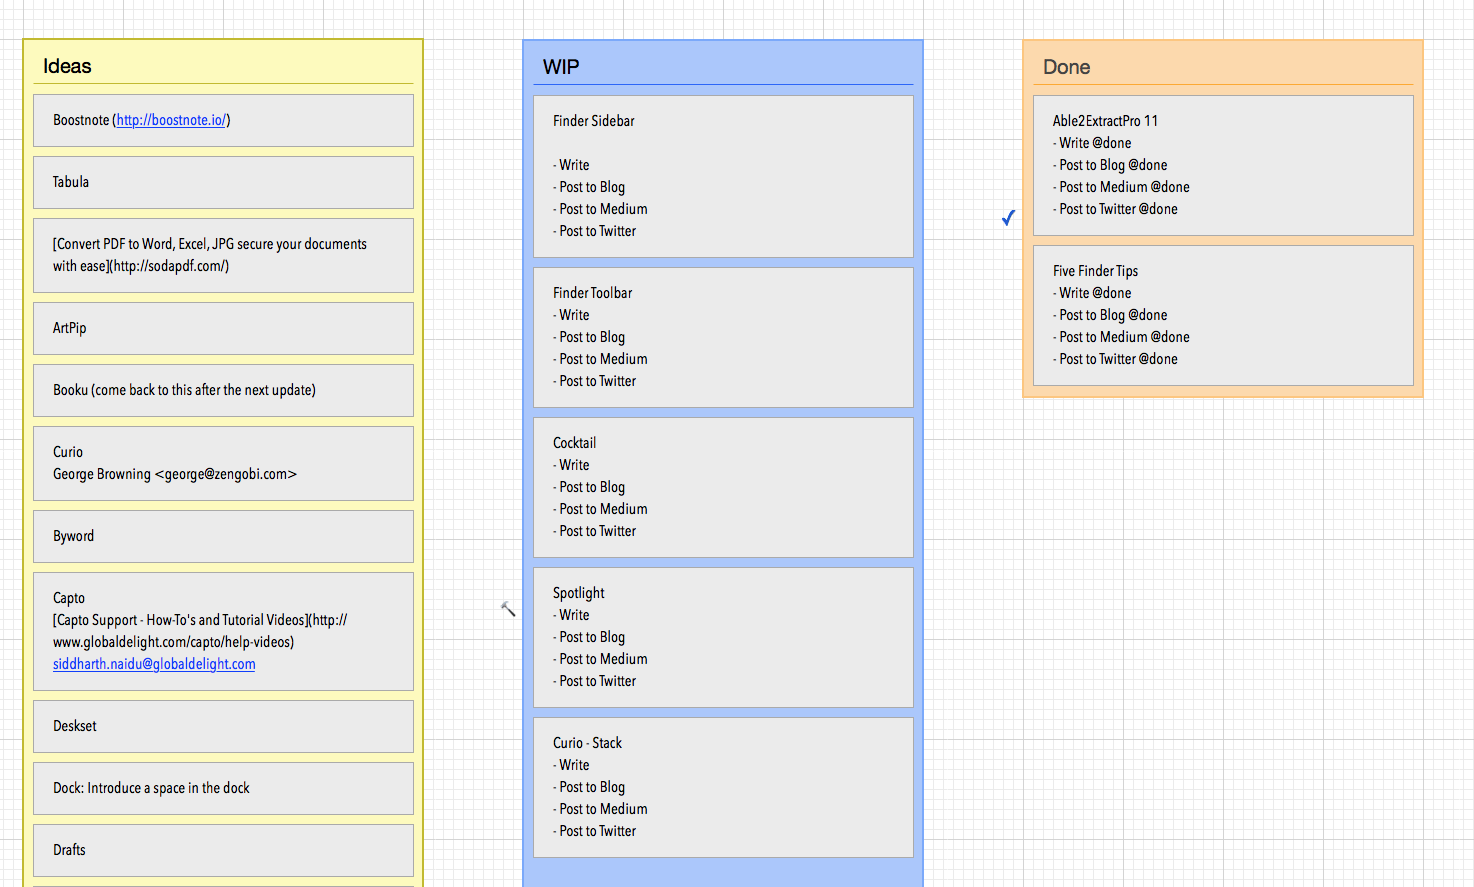 Curio Stacks
Stacks as implemented in Curio, reminds me of Trello. At any given point in time, I have a bunch of blog ideas listed under Ideas. I start work on one of them and move them on to the WIP Stack. I add components to the task at that stage: Write, Post to ipadpedia.net, Post to Medium.com & Post to Twitter. I move along that process and when all the components are done, I move them over to the Done Stack. I can assign due dates and other meta tags to each of these tasks.
It is a competent way of having a handle on the various aspects of a project whilst you are in the middle of it. Gives you direction and keeps you on track.
Conceptually, Stacks can also be used to include a product feature list to be implemented, then the move to a stack of those being worked on, and the corresponding move to the Done stack when the feature is implemented.
Stacks comes with support of a whole host of meta-data and it is a full-featured system of task management built right into Curio and its project management toolset.
 Curio Meets Eisenhower
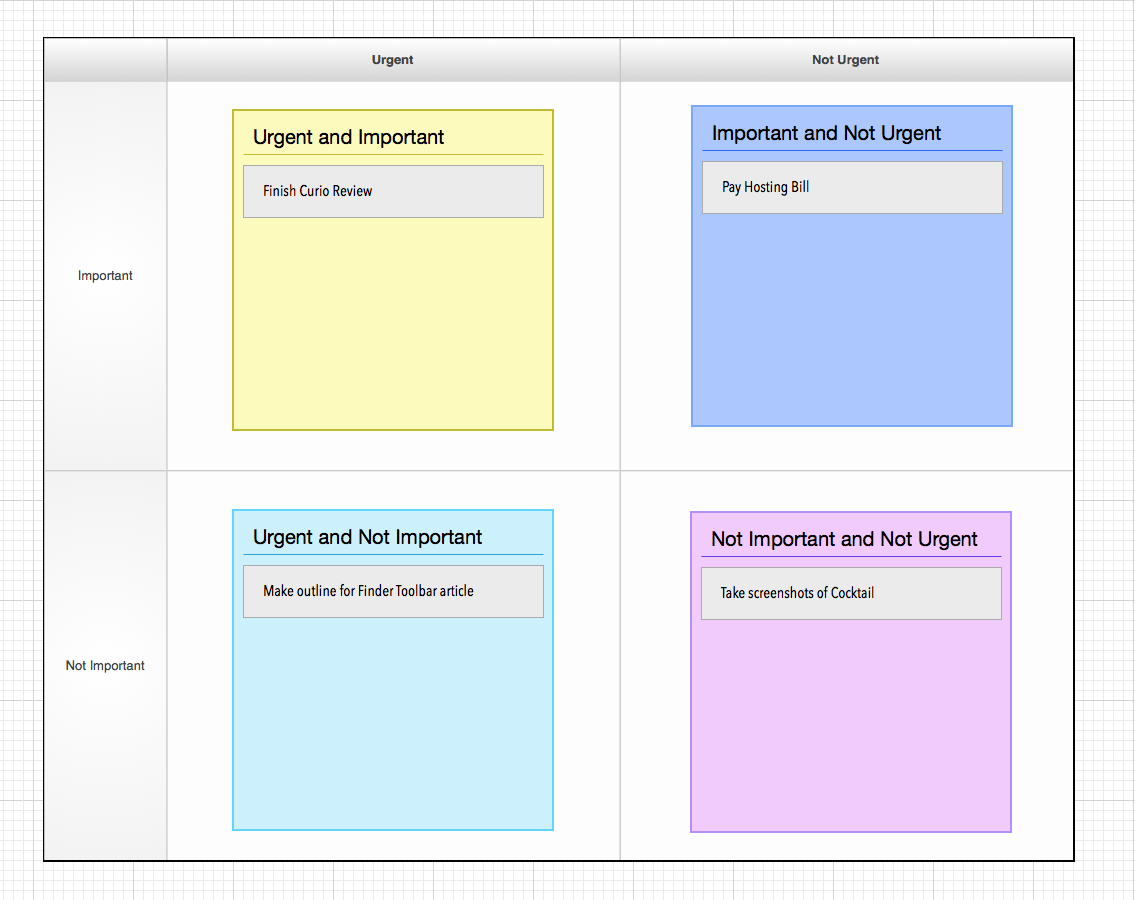
Another way of making use of Stacks is to design an implementation of the Eisenhower Decision Matrix. Gives you an overview of the tasks which are on the platter and the relative priority of them. I implement this through a confluence of two tools from Curio, the Table and the Stacks. It gives me some sense of what is pressing at a glance.
So, this is Stacks as implemented by Curio. Helping you get a handle on your projects and the associated tasks which make up your projects.
Conclusion
I am excited by Curio. I recommend it heartily.
macosxguru at the gmail thingie
Curio
Writing
January 31, 2017
Product: Able2Extract Professional 11
Price: $149.99
 Icon
Icon
Able2Extract Professional 11 is a unique product. It works with PDF files. It creates them. It converts them. It edits them and lets you control your PDF workflow with ease.
Admittedly a niche product, it is an useful tool if you are dealing with an influx of PDF files which you need to work with.
Conversions
For instance, if you have a PDF file which was generated by AutoCAD and you need to convert it into an AutoCad file, Able2Extract Professional 11 is the solution to your problem. It does less esoteric conversions too. You can convert to Excel, Word, Powerpoint, HTML, CSV, and the aforementioned AutoCAD.
It does conversions well. Or at least, as well as can be expected. The product is not perfect, some of the conversions seem like voodoo and the results are perfect. Some of them need work, but I think the activity of converting the PDF file to any other format is bound to be a little bit of a hair-tearing out experience. And the product doesn’t disappoint. It does some conversions beautifully and some of them were not ideal. You can help that process along and it requires some tinkering but I must admit that the act of taking a PDF of a spreadsheet and turning it into a CSV file is enough voodoo for me. I was impressed with the results of that exercise.
Scanned Image PDF Conversion
Sometimes you run into documents which have been scanned into the PDF format. By definition, these are more difficult to convert to anything usable. It is a good record to have but the documents themselves are not malleable. Able2Extract Professional 11 through its OCR engine is able to convert these kind of documents into workable formats which is voodoo of the highest order. Again, the process is easy, but the results vary and some of the results will leave you elated and some of them will be a tad frustrating.
Edit PDF Files Like a Boss
Able2Extract Professional 11 gives you powerful edit tools to work on a PDF file. You get to modify the contents and also split or merge PDF documents. You can edit the text and make general changes to PDF files.
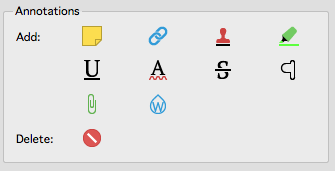 Annotations
The application gives you a comprehensive collection of annotation tools, including sticky notes, links, highlights and watermarks.
Create PDF Files With Ease
The application lets you create PDF documents from any application. It has security features and file customizations which give you complete control over the rendered output.
The Interface
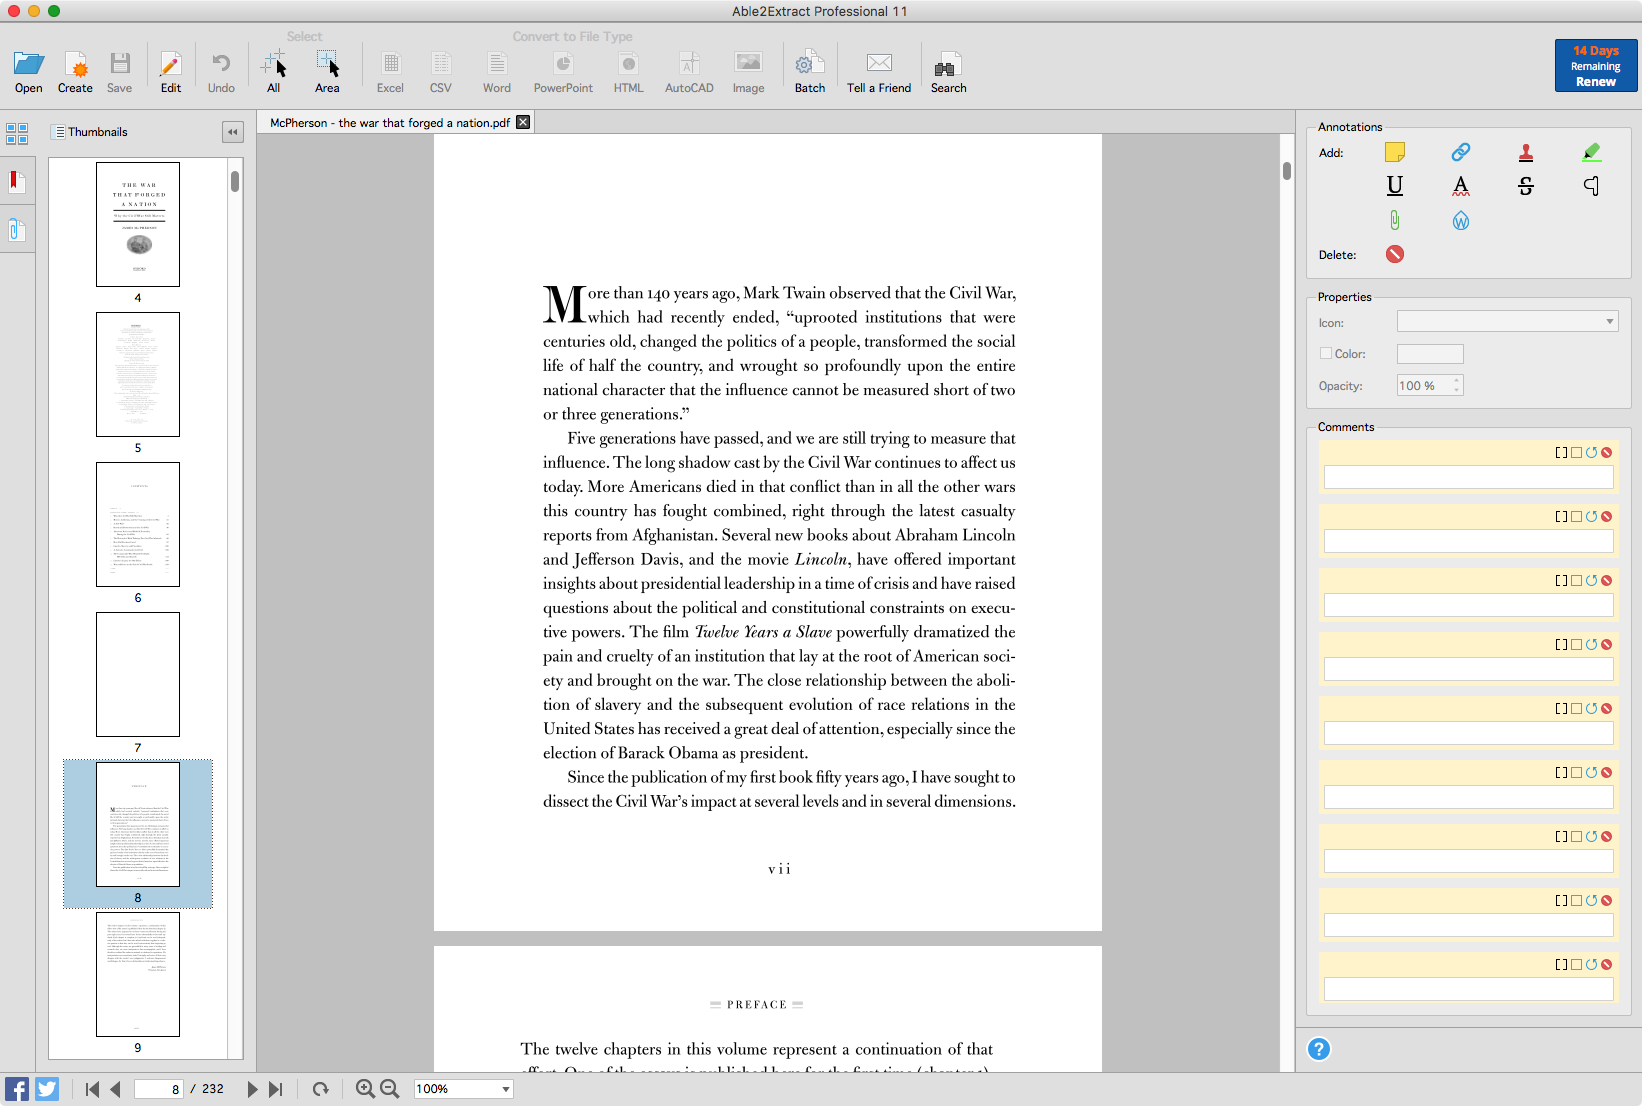 a2ep Interface
Able2Extract Professional 11 is not pretty. I am not sure it is trying to be. It is a product which is directed towards the business professional who needs to be able to work with PDF files. The interface is functional. It leads you through the tasks that you want to perform and it does it well.
Conclusion
Able2Extract Professional 11 is a professional tool directed towards a particular audience. If you need to handle PDF file creation, editing and conversions, it is a great tool to have in your toolset. It is efficient software geared towards fulfilling your need to conquer PDF files.
Able2Extract Professional 11 is highly recommended.
Update: A time limited license was provided by the developer looking for a review.
macosxguru at the gmail thingie
PDF
January 29, 2017
Five Finder Tips
 Finder Icon
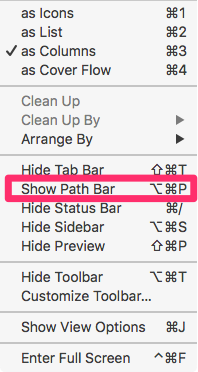
The Path Bar Is Versatile
 Path Bar
In the Finder, you turn on the Path Bar by choosing Show Path Bar from the View menu. Or press, ⌥ + ⌘ + P.
 Path Bar 2
You get the path of the selected file/folder at the bottom of the Finder. You can click on any part of the path to switch to it. You can right click on any folder and choose to open it in a new tab. You can drop files/folders on any part of the path to move them there. Makes navigating up and down the file hierarchy easy.
Tabs or Windows
 Finder Tabs or Windows
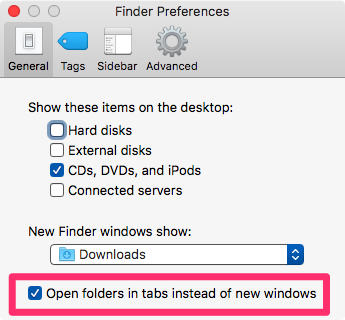
You can choose whether new Finder windows open in a new tab or in a new window. In Finder Preferences (⌘+, in the Finder). In the General tab, at the bottom is the choice of tabs or windows. Select this if you want tabs. Deselect for windows. If you are not accustomed to tabs, please try them. You might like them.
Where am I?
 Command Click Title
You can hold down the ⌘ key and click on the title of a Finder window. You are going to get a drop down menu showing the folder hierarchy. You can select any parent directory to switch to it. Another way to traverse the directory tree.
Use Auto-Complete to Fill in Folder Names
 Auto-Complete Go To
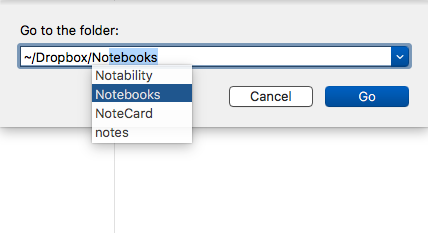
To switch to a different directory in the Finder, type ⇧ + ⌘ + G, in the resultant dialog box, start typing the name of the folder, the Finder will help you by auto completing it, hit tab and move on to typing the sub folder. Remember the shortcut for your home folder is ~.
Copy Path to Clipboard
In the Finder, select a file or folder, press ⌥ + ⌘ + C to copy the full path to the Clipboard. This is useful to work with directories in the Terminal. Remember to escape the spaces in your directory names with the key.
macosxguru at the gmail thingie
Finder
January 19, 2017
Hemingway Now Writes and Edits
 Hemingway icon
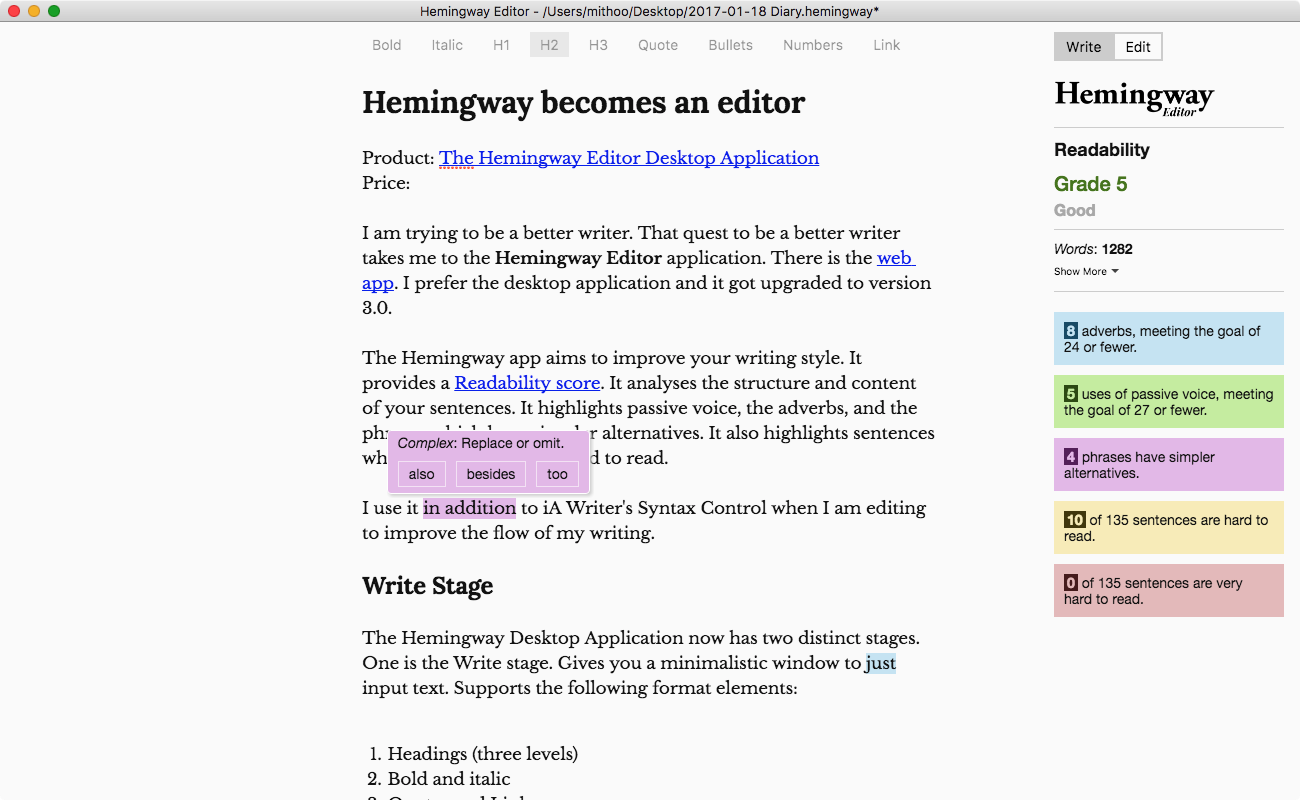
Product: The Hemingway Editor Desktop Application
Price: $19.99
I am trying to be a better writer. That quest to be a better writer takes me to the Hemingway Editor application. There is a web app. I prefer the desktop application and it has a new upgrade to version 3.0.
The Hemingway app aims to improve your writing style. It provides a Readability score. It analyses the structure and content of your sentences. It highlights passive voice, the adverbs, and phrases which have simpler alternatives. It also highlights sentences which are hard or very hard to read.
I use it along with iA Writer’s Syntax Control when I am editing to improve the flow and readability of my writing.
Write Stage
The Hemingway Desktop Application now has two distinct stages. One is the Write stage. Gives you a minimalistic window to input text. Supports the following format elements:
- Headings (three levels)
- Bold and italic
- Quotes and Links
- List both bulleted and numbered
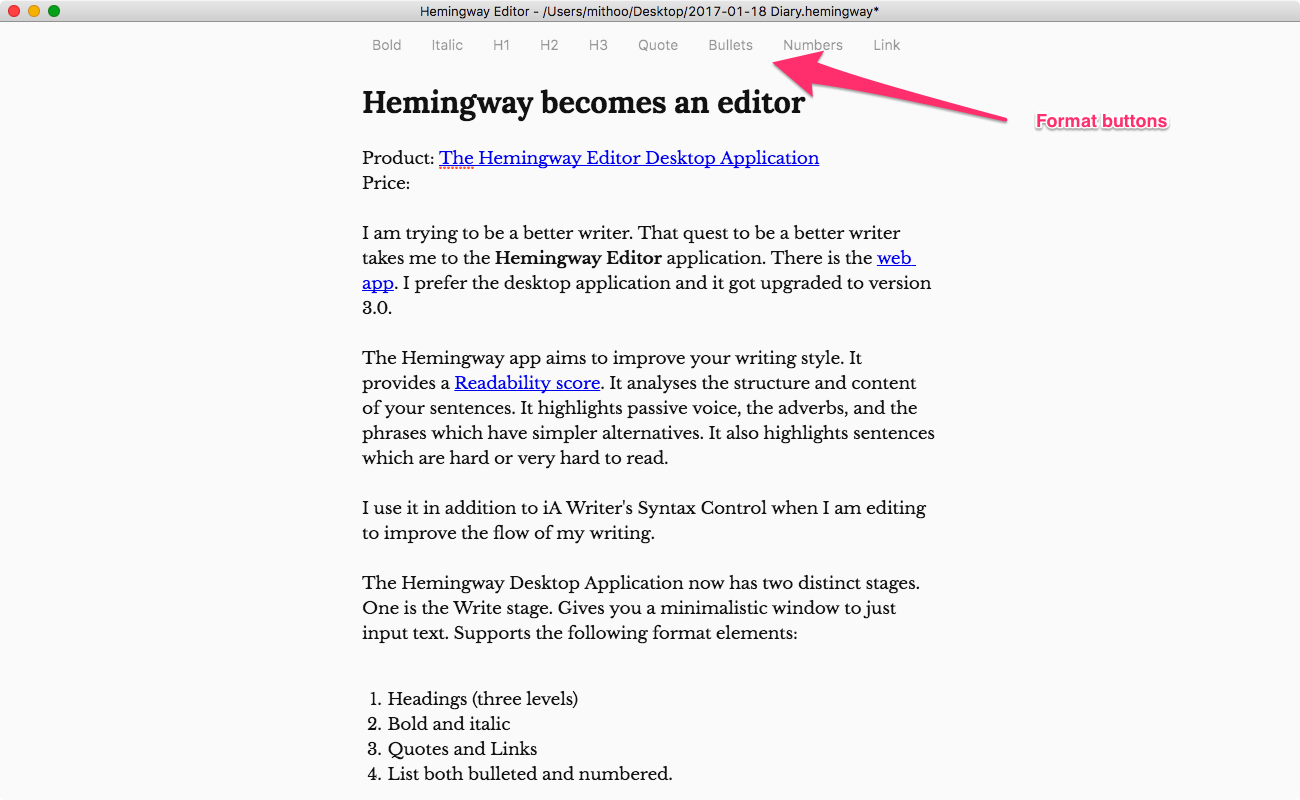 Hemingway Write Stage
I am surprised at the lack of explicit keyboard commands for the formatting commands. There are buttons at the top of the document to help you format your document. I don’t mind the buttons, but I want keyboard commands. Some of the keyboard commands do exist but they are not documented. ⌘B for bold and ⌘I for italic works. ⌘K works for inserting a link. There are no keyboard commands for bulleted or numbered lists. But you can outdent a bulleted paragraph (⌘[) or indent a bulleted paragraph (⌘]).
There are some keyboard commands to manipulate the environment. ⌘J to toggle between Write and Edit Mode. ⌘L to toggle on/off the right sidebar.
The full screen mode is usable and it is not a bad environment to work in.
Edit Stage
 Hemingway Edit Stage
After you finish writing you move on to the Edit stage. The edit stage gives you a nice colorful overview of how your document is doing. It gives you suggestions to improve the style of your content.
It is a great way of improving the readability of your writing.
Hemingway imports plain text files (.txt), Markdown files (.md), Web pages (.html) or Word documents. It lets you export your writing to the same formats. Additionally you can export to pdf files and even Hemingway highlighted pdf files.
This ability to export Hemingway highlighted pdf files makes the product useful to give feedback to your co-writers.
Improvements
These are the specific improvements I would like:
- More keyboard commands.
- Support Markdown. Let me write markdown tables and footnotes.
- Typewriter scrolling in full screen mode.
Conclusions
Hemingway app is another tool in my arsenal. I use it to improve as a writer. It might help you too. I recommend it.
macosxguru at the gmail thingie
Writing
 Bicycle For Your Mind