 Bicycle For Your Mind
Tutorial: Alfred, the Powerpack, Packal.org, and Launching Applications

There are some programs which fall in the category of: I cannot use a Mac without this. Alfred heads that list. It is an essential addition to my Mac. I use it multiple times a day, and the ⌘ + spacebar key is assigned to it and gets invoked for a whole host of activities.

This is a recommendation which doesn’t have any caveats. Get Alfred App - Powerpack. Don’t be cheap. Get the powerpack. It makes Alfred purr.
So, what does Alfred do? This is a list of stuff that Alfred does:
- Finds applications and files
- Searches the web
- Manages your clipboard and lets you add snippets
- Calculator and dictionary
- Interact with your Contacts
- QuickLook your files and documents
- Issue System Commands
- Large Type
- File Navigation (powerpack feature)
- iTunes (powerpack feature)
- Recent Documents (powerpack feature)
- Email (powerpack feature)
- 1Password (powerpack feature)
- Syncing (powerpack feature)
- Fallback searches (powerpack feature)
- Create and Import workflows (powerpack feature)
It is a bit overwhelming, isn’t it? Over the course of the next few months, I am going to give you examples of each of these activities and you are going to get a look at how to get Alfred to aid you anytime you are in front of your Mac.
Workflows
Alfred is primarily used for launching applications, but it really adds value to your life when you use the built-in workflows, get some workflows from the net, or write your own. There are various types of workflows. Some are single step workflows: Launch the screensaver. Some are multiple step workflows: Launch a group of web-sites. They can be as simple, or as complicated as the task you are trying to achieve. We are going to delve deeper into workflows in later articles. For the time being, you need to get yourself some workflows, they are curated at Packal.org, or are available in the forum maintained by the Alfred folks.
Packal.org
You will make your own workflows and I am going to show you some of mine in later articles, but in the meantime, after you have gotten Alfred and paid for the powerpack, go to Packal.org and download the Packal Updater. This is a package manager for Alfred workflows. It lets you update and manage workflows downloaded from Packal.org.
Installation is easy. Download the workflow. Double-click on it. Follow the prompts.
You are now ready to add workflows to the Alfred installation and get full use out of the application. Before you move on, we are going to segue into the keyboard command you will use to invoke Alfred.
⌘ + Spacebar
This is used by Spotlight. I don’t use Spotlight. If I need to, I can click on the magnifying glass icon on the menubar to invoke Spotlight. I have not done that in a few years. I changed the keyboard commands for Spotlight. Here is how you do it. Go to System Preferences. Either launch System Preferences from its Dock icon or go to the Apple Menu and select System Preferences. Click on the Spotlight preference pane. Click on the Keyboard Shortcuts… button on the bottom left.
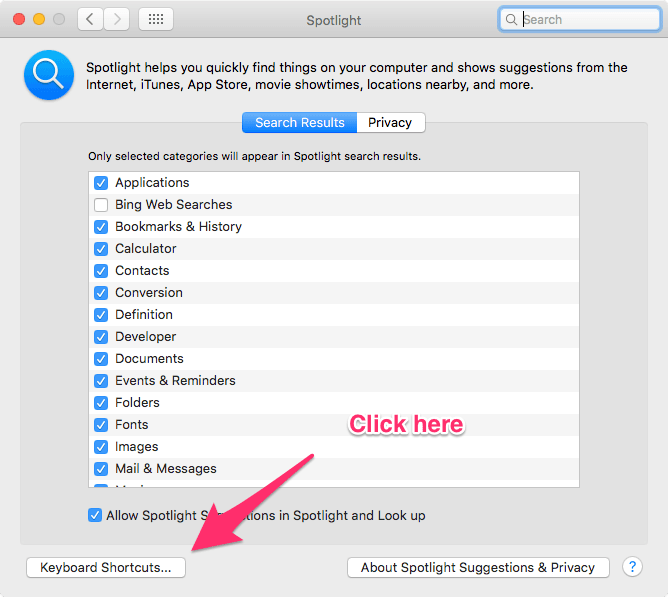
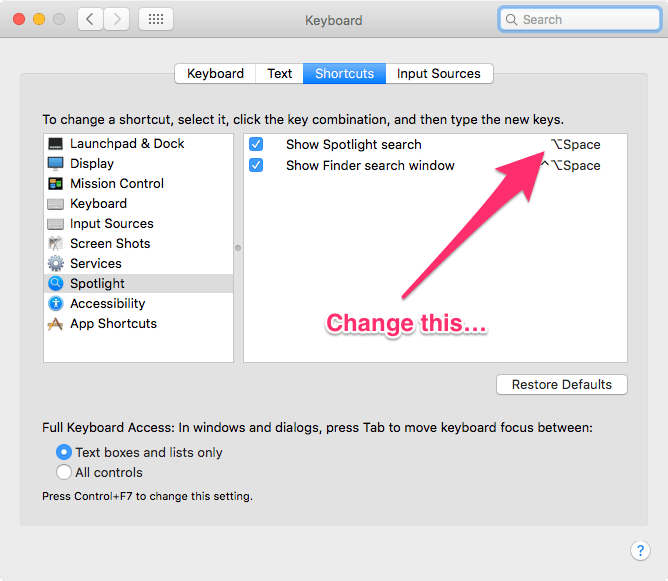
In the Keyboard shortcuts preference pane, change the shortcut for Show Spotlight Search to anything you prefer, ⌥ + Spacebar works fine. You can change it to anything you want.
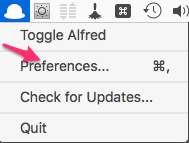
Go to Alfred Preferences by choosing it from the Alfred menu item.
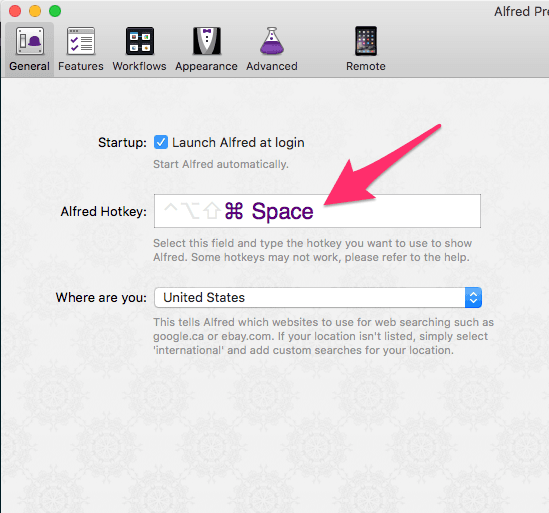
Go to General. Click on the Alfred Hotkey window and type the keyboard command ⌘ + spacebar. Just hold down the ⌘ key and hit the spacebar key. Now you have defined the keyboard command to launch Alfred.
You can assign other keys, but Alfred is the nerve center of operating the Mac. It should have the most easily accessible key. After using Alfred for a while, you are going to be sitting on other people’s Macs and mashing down on the ⌘ + spacebar keys and wondering how the world survives on a Mac without Alfred.
The Alfred folks have a write up on their knowledge base for this switch, here.
Today, I am going to show you how to launch applications. This is what Alfred is most used for.
Launching Applications
Hit your pre-defined keyboard command to invoke Alfred, in my case, ⌘ + spacebar. Type in the first few letters of the app, and Alfred is going to present you with a list. If the application you are trying to launch is the first item on the list, hit return, and the application will launch. If it is not the first item on the list, look for it on the list that Alfred gives you, type the keyboard command that is to the right of the application, ⌘ + number, and the application will launch. Usually Alfred learns to associate the abbreviation you used with the application you launched and the next time you do this, the required application will be the first in your list and you can just hit return and go on with your work.
Launching Applications Through Hotkeys
It is convenient to type in some letters from the name of the application, having them show up in the Alfred window and hitting return to launch them. However, it is even more convenient to setup some hotkeys for the apps you regularly use so that you don't have to type in any part of the name. Just press your hotkey and let the assigned application launch. It is easy to do.
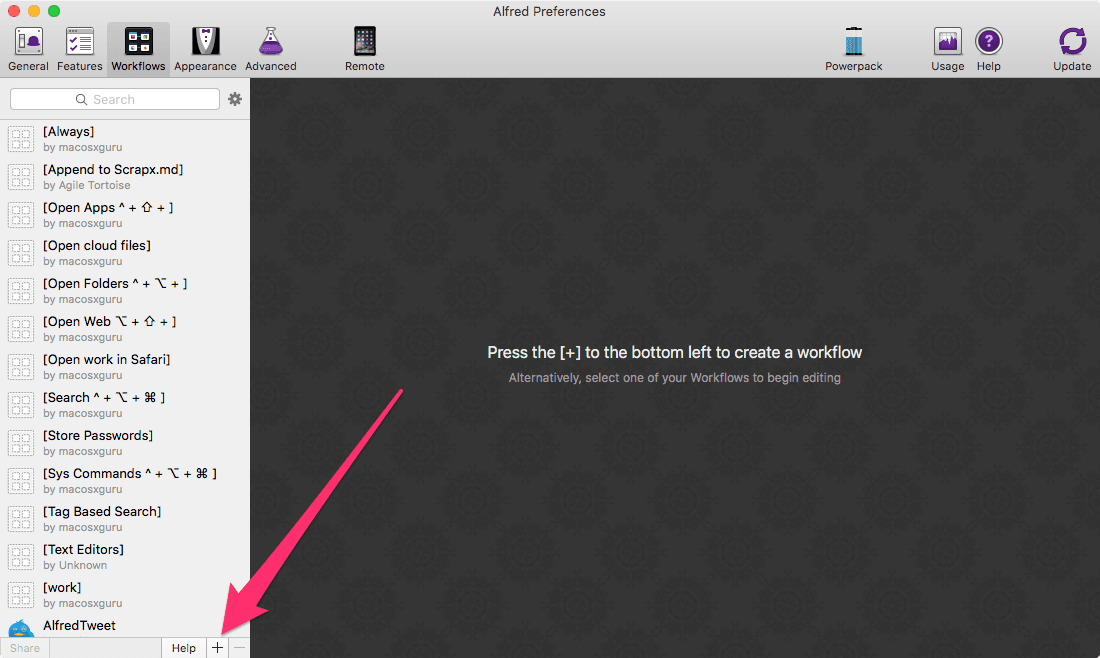
Go to to the Workflow tab of Alfred preferences.
Click on the plus sign at the bottom left of the workflow tab.
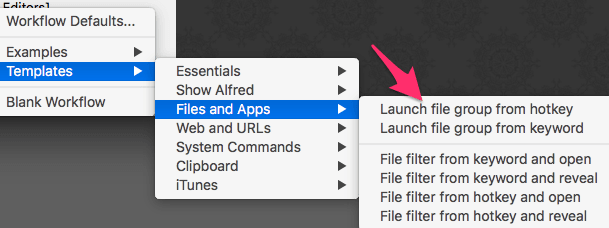
Follow Templates>Files and Apps> and choose Launch File Group from hotkey.
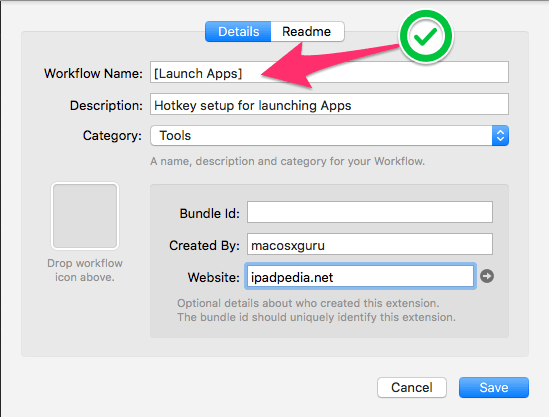
Name the workflow. I enclose the name in square brackets. Makes my workflows be at the top of the list of workflows. You are going to download workflows from packal and you need to know which of them are your creations and which were created by other folks. Fill in the rest of the details. Click on Save.
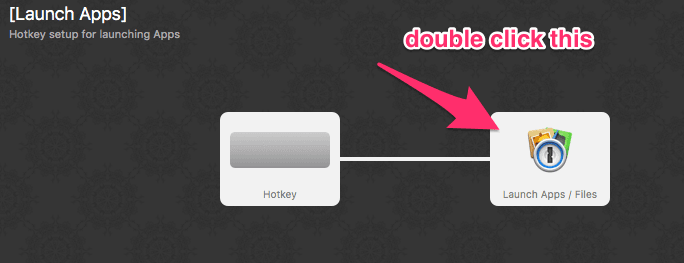
You are going to be shown the workflow steps. Double click on the Launch Apps/Files icon.
You are now in the dialog box where you get to add the application you want to launch with a hotkey.
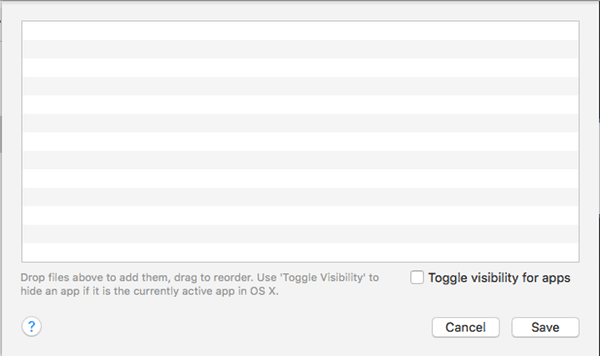
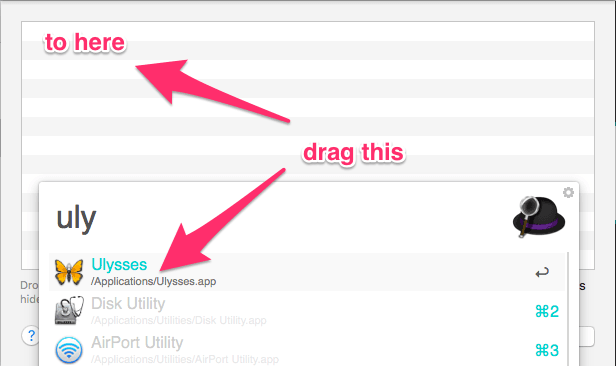
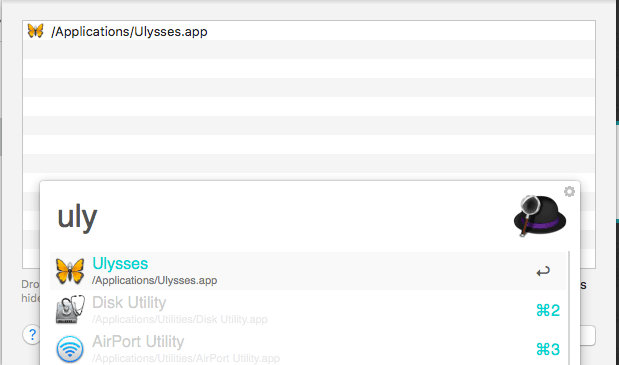
With that dialog box active, just press ⌘ + Spacebar, type the first few letters of the app you want to launch. In my example, it is Ulysses, now click and hold the application in your dropdown list, and drag it to the Launch Apps window. You have added an app to be setup for hotkey launching.
It should look like the following screenshot. Click Save.
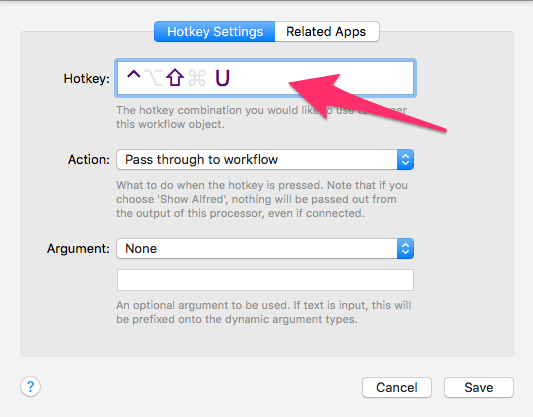
Now double click on the hotkey button.
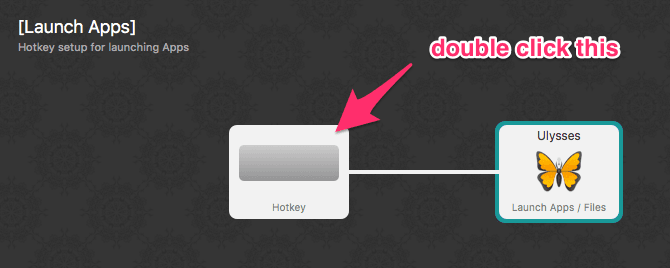
Assign a particular hotkey. Choose the Pass through to Alfred Action. None in the Argument dropdown.
You are going to be making a ton of workflows for Alfred. They are going to do different categories of things. For instance, you are going to have a bunch of hotkeys to launch apps, you are going to have hotkeys to open folders, you are going to have a another set of hotkeys to open web sites you visit often, and so on. It is easier to remember them if you have some order to your hotkeys. For instance, launching all apps can be assigned to hotkeys starting with ⌃ + ⇧. Opening folders can start with ⌃ + ⌥, and so on. If you have them categorized, your probability of remembering them later increases. In my case, I launch apps with the ⌃ + ⇧ hotkey. So the key to assign to Ulysses is ⌃ + ⇧ + U.
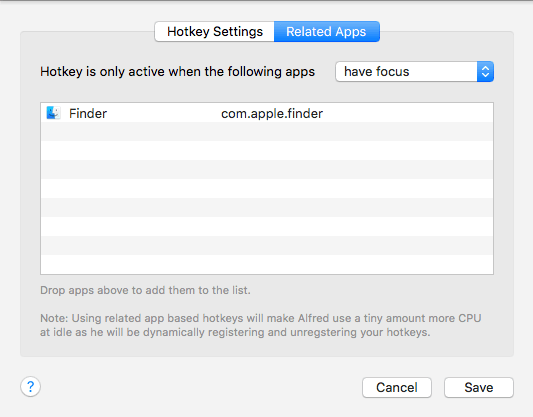
Like I said, you are going to assign keyboard commands to a lot of actions and they would be very useful if they worked system wide, unfortunately they don't always work like that. You will sometimes be in applications which are rich in keyboard commands and your hotkeys to achieve things in Alfred are going to conflict with the keyboard commands in the application you are in. You want to stay away from such conflicts. You can make your life easier by specifying one app, the Finder, where your keyboard commands will work. I know, I am introducing an extra step here. Switching to the Finder is an added step and it is a pain sometimes, but keyboard conflicts are a worse pain. So, how does one achieve this?
Click on the Related Apps tab on the hotkey setup pane. Type ⌘ + Spacebar to bring up the Alfred window, type Finder, and drag it to the list. Choose have focus from the drop down menu and you are set. It occurs to me that you can achieve the same thing by excluding apps which are keyboard command heavy from the list by choosing them in the list as "does not have focus". Then the keyboard commands will not work in those particular apps but will work everywhere else. Since I live in text editors and they are all keyboard heavy, I am going to stick to having my launch keyboard commands only work in the Finder, but you do have the choice of just excluding some apps, while having the commands available to you in most of the other apps you are in.
Launching Pre-defined Sets of Applications
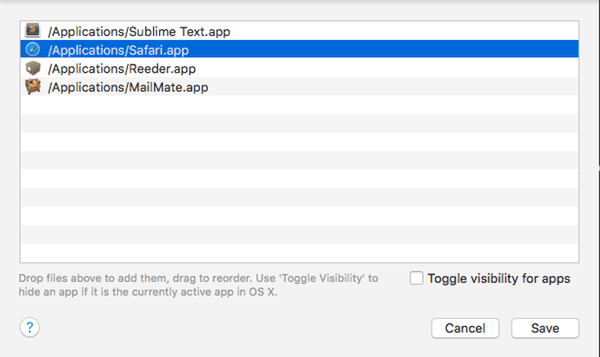
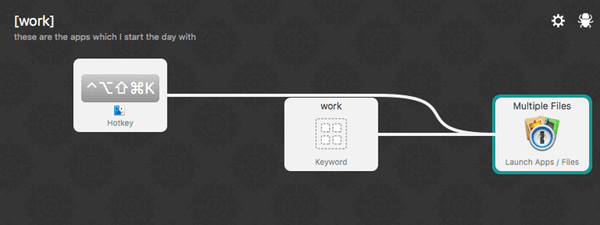
Lastly for this article, I am going to talk about launching a set of applications. There are times when you need a bunch of applications loading all at once. Every day, when I first sit down for work, I need to have the following apps running, Sublime Text, MailMate, Safari, and Reeder. I can launch them individually or I can set up a workflow which launches them for me. It is the same process as outlined before, except when you are adding apps to launch, instead of one app, you add all the apps you want to launch. It will look like this.
Assign a hotkey to the list of apps and you are on your way.
Conclusion
So, in this tutorial we learnt how to launch applications by typing in a part of the name of the application. We also learnt how to set up workflows which let us launch a single or multiple applications though a hotkey.
Update:
- Cleaned up the sequence of screenshots.
- Tried to improve the writing.
macosxguru at the gmail thingie